Verified on: July 11, 2026. OpenRouter may change its free-model availability, limits, and account policies at any time.
How to Use Free AI Models on OpenRouter in 2026
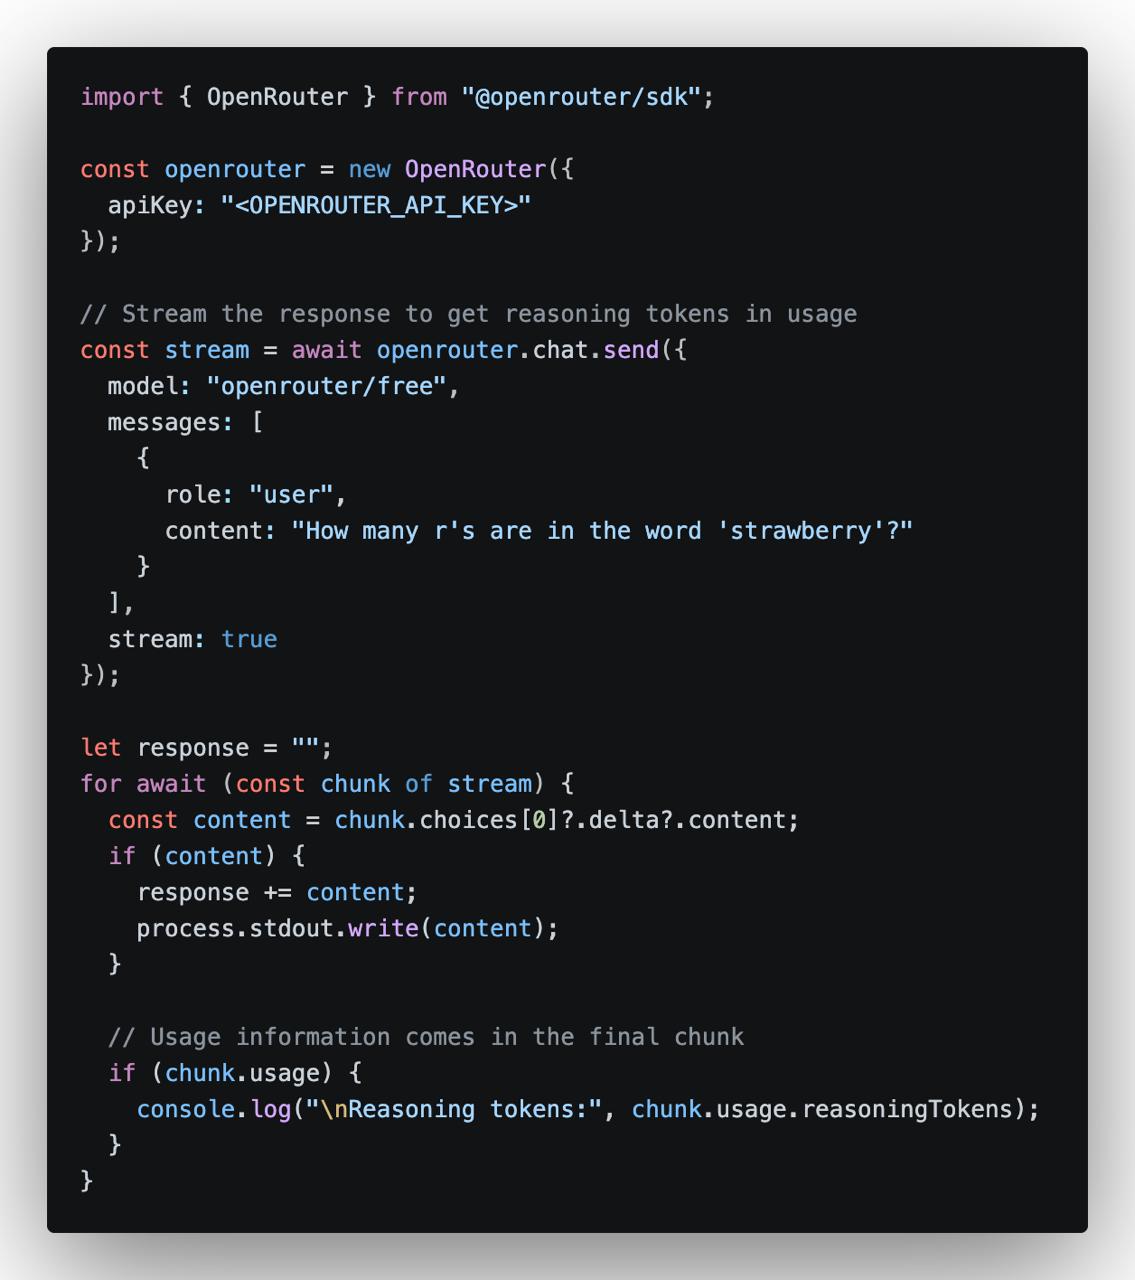
OpenRouter allows developers to access many AI models through one OpenAI-compatible API. It also provides a selection of free models that can be used for testing, learning, personal tools, and small AI projects.
You can use free models in two ways:
Use openrouter/free and let OpenRouter automatically select an available free model.
Choose a specific model whose ID ends with :free.
What Is OpenRouter Free?
The OpenRouter Free Models Router uses this model ID:
openrouter/free
When you send a request, OpenRouter chooses a compatible free model based on current availability and the features required by your prompt.
This is the easiest option for general testing. However, the underlying model may change between requests, so the writing style and response quality may not always be identical.
A specific free model usually has an ID ending with:
:free
For example:
provider/model-name:free
Because free-model availability changes frequently, copy the current model ID directly from the OpenRouter model page instead of using an old model name from another tutorial.
Check that the API key is correct and that the request contains:
Authorization: Bearer YOUR_API_KEY
404 or No Available Provider
The selected free model may no longer be available. Copy the latest model ID from OpenRouter or switch to openrouter/free.
429 Too Many Requests
You have reached a rate limit or daily free-model allowance. Wait before retrying and add request limits to your own application.
Is OpenRouter Free Suitable for Production?
Free models are useful for testing, small personal tools, demonstrations, and early product prototypes. They are less suitable for important production services because:
Free models may be removed or changed.
Provider capacity may be temporarily unavailable.
Response speed may vary.
The automatic free router may use different models.
Daily request limits are relatively low.
For a production application, use a stable model, add fallback models, set timeouts, monitor usage, and configure a maximum budget.
Security Tips
Keep the API key on the server.
Create separate keys for development and production.
Set a credit limit when creating a key.
Add user and IP rate limits to public AI endpoints.
Revoke the key immediately if it is exposed.
Do not send passwords or confidential data to free models.
Conclusion
OpenRouter is one of the easiest ways to test free AI models through a single API. Use openrouter/free when you want OpenRouter to select an available free model automatically, or choose a specific model ending in :free when you need more consistent results.
The basic process is simple: create an account, generate an API key, select a free model, and send requests to the OpenRouter OpenAI-compatible endpoint.
Free models are ideal for learning and prototyping, but their availability and limits can change. Always check the current OpenRouter model page before relying on a specific free endpoint.
Verification date: July 11, 2026. The NVIDIA Build interface, API key application process, endpoint availability, and official documentation referenced in this article were checked on this date. NVIDIA may update model availability, account requirements, rate limits, and free-access policies at any time.
NVIDIA is best known for GPUs, but the company also provides developers with hosted AI inference APIs through NVIDIA NIM and the NVIDIA Build platform.
By joining the free NVIDIA Developer Program, you can generate an NVIDIA API key and use eligible hosted NIM endpoints for AI development, experimentation, testing, and prototyping. You do not need to own an NVIDIA GPU or deploy a large language model on your own server to get started.
This guide explains how to create an NVIDIA account, generate a free NVIDIA AI API key, select an available model, test the key with cURL, and connect NVIDIA NIM to Python, Node.js, PHP, and OpenAI-compatible applications.
Important: NVIDIA describes these hosted APIs as free serverless APIs for development and as free NIM API access for prototyping. Free access should not be interpreted as a permanent, unlimited, production-grade service-level agreement.
What Is an NVIDIA AI API Key?
An NVIDIA AI API key is a credential used to authenticate requests sent to supported NVIDIA-hosted AI endpoints.
A generated key normally begins with the following prefix:
Many NVIDIA-hosted large language model endpoints use an API structure compatible with the OpenAI Chat Completions format. This means an application that already supports a custom OpenAI-compatible provider can often connect to NVIDIA by changing three values:
The API base URL
The API key
The model identifier
What Is NVIDIA NIM?
NVIDIA NIM, or NVIDIA Inference Microservices, is a collection of optimized inference services designed to simplify the deployment and use of AI models.
Instead of manually downloading model weights, configuring CUDA libraries, selecting an inference engine, and maintaining a GPU server, developers can use a standardized API to send prompts and receive model responses.
Depending on the model and licensing conditions, NIM can be used through:
NVIDIA-hosted serverless API endpoints
Downloadable NIM containers
Cloud GPU infrastructure
Private data centers
NVIDIA RTX workstations
Enterprise AI infrastructure
For this tutorial, we are using the NVIDIA-hosted development endpoints available through NVIDIA Build.
NVIDIA NIM APIs
What Can You Build with a Free NVIDIA AI API Key?
The NVIDIA API catalog includes multiple categories of AI models and services. The exact selection changes over time, but available categories may include:
Text generation and conversational AI
Reasoning models
Code generation and code analysis
Vision-language models
Image and visual-content processing
Embedding models
Reranking models
Speech and audio processing
Safety and moderation models
Biology, chemistry, climate, and scientific AI models
Typical development projects include:
AI chatbots
Customer-support assistants
Retrieval-augmented generation systems
Document summarization tools
Code assistants
WordPress AI plugins
Laravel or Node.js AI applications
Semantic search engines
Internal knowledge-base assistants
AI agent prototypes
Requirements
To apply for an NVIDIA API key, you generally need:
A working email address
An NVIDIA account
Membership in the NVIDIA Developer Program
A modern web browser
Acceptance of the applicable NVIDIA terms
Account-verification requirements can vary by region, account status, and NVIDIA’s current fraud-prevention policies. Follow the instructions displayed during registration.
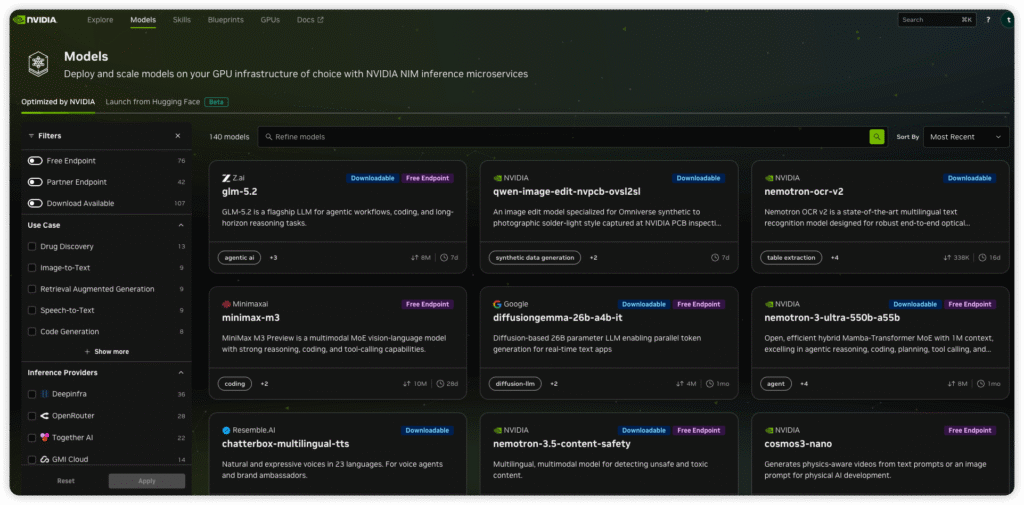
NVIDIA Build is the official catalog for exploring hosted AI endpoints, NIM models, blueprints, code samples, and related AI development resources.
Step 2: Create or Sign In to Your NVIDIA Account
Click Sign In.
If you already have an NVIDIA account, enter your email address and continue with the login process.
If you do not have an account, enter your email address and complete the registration process. Depending on NVIDIA’s current interface, you may be asked to:
Enter your email address.
Verify your email.
The NVIDIA API key sign-in page currently states that users receive access to free serverless APIs for development and that proceeding joins the user to the NVIDIA Developer Program.
Sign in with an NVIDIA account and join the NVIDIA Developer Program.
Step 3: Open the NVIDIA API Key Settings Page
After signing in, You can normally create an API key in one of two ways:
Search for a model that provides a hosted endpoint. NVIDIA may display labels such as:
Free Endpoint
Downloadable
Deprecated
Partner Endpoint
Preview
Label
Meaning
Free Endpoint
A hosted endpoint is available for eligible development or prototyping use.
Downloadable
The model or NIM can be deployed on supported infrastructure. This does not automatically mean a hosted endpoint is available.
Partner Endpoint
The endpoint may be operated or delivered through an NVIDIA partner.
Deprecated
The endpoint has been retired or is scheduled for removal.
Preview
The service is intended for evaluation and may change without production-level guarantees.
Do not assume that every model shown in the catalog can be called for free. Always open the individual model page and confirm its current endpoint status.
Check each model’s current endpoint status. A model listed in the catalog is not necessarily available as a free hosted endpoint.
Step 5: Open a Model and Review Its API Example
Click an available model. A model page may contain:
An interactive prompt area
A model card
API documentation
Python examples
Node.js examples
Shell or cURL examples
LangChain examples
The exact API model identifier
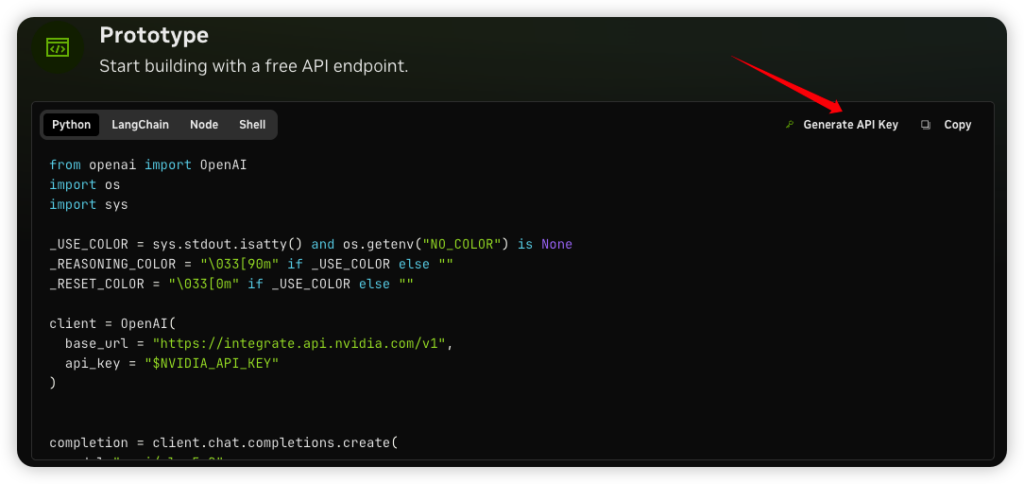
A Get API Key button
The model identifier is especially important. It may look similar to:
publisher/model-name
Always copy the identifier directly from the current model page. Do not rely on an old tutorial, video, or cached model list because NVIDIA can rename, replace, update, or deprecate endpoints.
Step 6: Generate the NVIDIA API Key
Click Get API Key, Generate API Key, or the equivalent button shown in your account.
If NVIDIA asks for a key name, use a descriptive name that identifies the project or environment:
Avoid using generic names such as test for every key. Descriptive names make it easier to revoke a compromised key without affecting unrelated applications.
If the interface provides an expiration option, select an appropriate validity period based on the project. A shorter expiration period reduces the risk of abandoned credentials remaining active.
Step 7: Copy and Secure the Key
After the key is generated, copy it immediately and store it securely.
nvapi-xxxxxxxxxxxxxxxxxxxxxxxxxxxxxxxx
Do not place the real key in:
Public GitHub repositories
Browser-side JavaScript
Public WordPress source code
Blog screenshots
Forum posts
Application error messages
Publicly accessible log files
Unencrypted configuration files
On Linux or macOS, store the key in an environment variable:
Testing with cURL is the fastest way to confirm that the account, key, endpoint, and model identifier are working before integrating the API into an application.
For OpenAI-compatible NVIDIA-hosted LLM endpoints, the commonly used base URL is:
Never hard-code a production API key directly in a public WordPress plugin or theme file. Use a server-side environment variable or a protected secret-management system.
Connect NVIDIA NIM to an OpenAI-Compatible Application
Many AI clients and frameworks support custom OpenAI-compatible providers. The typical configuration is:
API Base URL:
https://integrate.api.nvidia.com/v1

API Key:
nvapi-xxxxxxxxxxxxxxxxxxxxxxxx

Model:
REPLACE_WITH_THE_CURRENT_MODEL_ID
This can work with compatible chat interfaces, RAG tools, agent frameworks, workflow platforms, and custom applications.
However, compatibility is not guaranteed for every feature. A third-party application may expect:
A specific response format
A working /v1/models endpoint
Tool-calling support
Structured-output support
A specific multimodal message format
Parameters that the selected NVIDIA model does not support
Always test the official model-page example first. Once that succeeds, configure the same endpoint, model ID, and parameters in the third-party application.
How to Choose an NVIDIA AI Model
General Chat and Writing
Choose a general instruction-following model for:
Chatbots
Article drafting
Summarization
Translation
Customer support
Information extraction
Reasoning
Choose a reasoning-oriented model for:
Multi-step analysis
Mathematics
Complex coding problems
Planning
Agent workflows
Code Generation
Choose a coding model for:
Generating code
Debugging
Refactoring
Writing tests
Creating SQL queries
Explaining source code
Vision
Choose a vision-language model for:
Image understanding
Screenshot analysis
Chart interpretation
Visual question answering
OCR post-processing
Embeddings and Reranking
Choose an embedding or reranking model for:
Semantic search
RAG pipelines
Document retrieval
Similarity matching
Search-result reranking
Is the NVIDIA API Really Free?
NVIDIA’s official developer page currently describes free access to NIM API endpoints for prototyping, powered by NVIDIA infrastructure. The NVIDIA Build API key page also advertises free serverless APIs for development.
The safest interpretation is:
NVIDIA provides eligible developers with free hosted API access for development, learning, experimentation, testing, and prototyping, subject to current model availability, access policies, rate limits, and applicable terms.
Do not assume that the service includes:
Unlimited production traffic
A guaranteed request rate for every model
A permanent endpoint for every model
A formal production SLA
Unlimited tokens or inference credits
Automatic commercial-production rights for every model
Older NVIDIA forum posts and third-party tutorials may mention fixed credit allocations or a specific request-per-minute value. These figures have changed over time and may not apply uniformly to every model or account in 2026.
A June 2026 NVIDIA forum discussion indicated that free-tier rate limits can depend on the model, use case, and current platform traffic. For this reason, your application should rely on actual HTTP responses and current account information rather than assuming a universal rate limit.
Development Access vs. Production Deployment
Usage Type
Typical Purpose
Important Consideration
Hosted free endpoint
Learning, testing, evaluation, and prototyping
Subject to model availability, free-access policies, and rate limits
Self-hosted NIM
Private development or controlled infrastructure
You provide the GPU infrastructure and must comply with applicable licensing
Enterprise production
Commercial workloads requiring support and production guarantees
May require NVIDIA AI Enterprise licensing and production infrastructure
Before using an endpoint in a commercial production service, verify:
The NVIDIA service terms
The selected model’s license
Data-processing and privacy requirements
Production-use restrictions
Rate limits
Support availability
Required enterprise licensing
Common NVIDIA API Errors
401 Unauthorized
A 401 response usually means the API could not authenticate the request.
Check the following:
The API key was copied correctly.
The key does not contain leading or trailing spaces.
The key has not expired.
The key has not been revoked.
The request includes the Bearer prefix.
Correct header:
Authorization: Bearer nvapi-xxxxxxxx
Incorrect header:
Authorization: nvapi-xxxxxxxx
403 Forbidden
Possible causes include:
The account has not completed verification.
The selected model is unavailable to the account.
The endpoint has regional or policy restrictions.
Updated terms have not been accepted.
The selected model is not available as a hosted endpoint.
404 Model Not Found
A 404 or model-not-found response can occur when:
The model ID is misspelled.
The display name was used instead of the API model ID.
The model version has changed.
The endpoint has been deprecated.
A self-hosted model ID was used with a hosted endpoint.
Return to the current NVIDIA model page and copy its official Shell or Python example.
429 Too Many Requests
A 429 response means the request was rate-limited or the current usage allowance was exceeded.
A production-quality client should implement:
Exponential backoff
Random jitter
Concurrency limits
Request queues
Response caching
Maximum retry counts
Fallback behavior
Example Python retry logic:
import os
import random
import time

from openai import OpenAI, RateLimitError


client = OpenAI(
    api_key=os.environ["NVIDIA_API_KEY"],
    base_url="https://integrate.api.nvidia.com/v1",
)

for attempt in range(5):
    try:
        response = client.chat.completions.create(
            model="REPLACE_WITH_THE_CURRENT_MODEL_ID",
            messages=[
                {
                    "role": "user",
                    "content": "Hello",
                }
            ],
            max_tokens=100,
        )

        print(response.choices[0].message.content)
        break

    except RateLimitError:
        if attempt == 4:
            raise

        delay = (2 ** attempt) + random.random()
        print(
            f"Rate limited. Retrying in {delay:.1f} seconds."
        )
        time.sleep(delay)
400 Bad Request
A 400 response usually indicates an invalid request. Common causes include:
Malformed JSON
An unsupported parameter
An invalid message structure
A token limit that is too high
An invalid temperature value
An incorrect multimodal input format
Start with the exact example shown on the model’s API page. Modify one parameter at a time after the original example works.
Timeouts
A request may take longer when the model is busy, the prompt is large, the requested output is long, or the selected model performs extensive reasoning.
Configure reasonable connection and response timeouts:
No. NVIDIA-hosted endpoints run remotely. Your computer only sends HTTPS requests and receives responses.
Do I need to install CUDA?
No. CUDA is not required when you are calling an NVIDIA-hosted endpoint through its web API.
Is a credit card required?
The NVIDIA Build sign-in page currently advertises free serverless APIs for development. The basic NVIDIA Developer Program registration and hosted development access do not normally require deploying paid cloud GPU infrastructure. Account requirements can change, so follow the current registration interface.
Can one API key call multiple models?
A key can generally authenticate requests to multiple models that the account is authorized to access. However, each model still has its own endpoint status, supported parameters, availability, and usage conditions.
Can I put the API key in a WordPress page?
No. Never expose the key in a page, block, shortcode output, or browser-side JavaScript. Send the request from PHP on the WordPress server.
Can I use the free endpoint in a commercial application?
The free hosted endpoints are primarily described as development and prototyping services. Before launching a commercial production workload, verify the current NVIDIA terms, model license, production-use conditions, privacy requirements, and any NVIDIA AI Enterprise licensing requirements.
Why is a model from an older tutorial no longer available?
NVIDIA regularly changes its model catalog. A model may be renamed, updated, replaced, restricted, or deprecated. Always use the current model catalog rather than copying an old model ID.
Is there a universal requests-per-minute limit?
You should not assume one universal limit. NVIDIA forum guidance published in 2026 indicates that free-tier rate limits can depend on the model, use case, and current platform traffic. Handle HTTP 429 responses and inspect the latest account and model documentation.
Store the key in a server-side environment variable.
Test the endpoint with cURL.
Integrate it with Python, Node.js, PHP, or another compatible client.
Add authentication, rate limiting, retries, caching, and monitoring.
Recheck licensing and production requirements before commercial deployment.
Conclusion
NVIDIA Build provides one of the easiest ways to experiment with hosted AI models without purchasing a GPU or deploying an inference server.
The basic workflow is straightforward: create an NVIDIA account, join the Developer Program, choose an eligible model, generate an nvapi- key, and test the API with the example provided on the model page.
The API is especially useful for evaluating models, creating prototypes, building RAG demonstrations, testing AI agents, and adding experimental AI features to Python, Node.js, PHP, Laravel, or WordPress projects.
Remember that model availability and free-access rules can change. Treat the NVIDIA Build interface and official NVIDIA documentation as the authoritative sources, protect the API key on the server, and verify the licensing requirements before moving a prototype into production.
WireGuard is a lightweight, high-performance VPN protocol designed to provide secure network tunnels with a relatively simple configuration model. It is integrated into modern Linux kernels and can be managed through the wg and wg-quick utilities.
This tutorial explains how to install and configure a WireGuard VPN server and a Linux client on:
Ubuntu 24.04 LTS
Ubuntu 22.04 LTS
Debian 12 or later
Linux Mint 21 or later
The completed configuration will allow the client to route all IPv4 internet traffic through the WireGuard VPN server.
Network Configuration Used in This Tutorial
The following example values are used throughout this guide:
Setting
Example value
WireGuard interface
wg0
Server VPN address
10.8.0.1/24
Client VPN address
10.8.0.2/24
WireGuard UDP port
51820
Server public IP
203.0.113.10
Server internet interface
eth0
VPN network
10.8.0.0/24
Replace the example server IP address and network interface with the actual values from your environment.
Prerequisites
Before starting, make sure you have:
A VPS or server running Ubuntu, Debian, or Linux Mint.
Root access or a user account with sudo privileges.
SSH access to the VPN server.
A public IPv4 address or a hostname pointing to the server.
UDP port 51820 allowed by the hosting provider or cloud firewall.
A Linux client on which WireGuard can be installed.
This guide assumes that the server has direct internet access and will act as the default gateway for the VPN client.
Part 1: Configure the WireGuard Server
Step 1: Update the Server
Connect to the server through SSH:
ssh username@SERVER_PUBLIC_IP
Update the package index:
sudo apt update
Optionally install available package updates:
sudo apt upgrade -y
The original command:
sudo apt updatesudo apt install wireguard
is invalid because it combines two commands without a separator. Each command must be placed on a separate line or joined with &&.
Step 2: Install WireGuard
Install the WireGuard userspace tools:
sudo apt install wireguard -y
Verify that the command is available:
wg --version
You can also confirm that the kernel supports WireGuard:
sudo modprobe wireguard
Check whether the module was loaded:
lsmod | grep wireguard
On modern Ubuntu and Debian systems, WireGuard support is normally included in the kernel, while the wireguard package provides the administration utilities and related components.
Step 3: Identify the Server’s Internet Interface
The WireGuard server must perform Network Address Translation on its external network interface.
Run:
ip route show default
Example output:
default via 192.0.2.1 dev eth0 proto dhcp src 203.0.113.10
In this example, the external interface is:
eth0
Depending on the server, the interface may instead be named:
ens3
enp1s0
ens18
venet0
You can extract the interface name automatically with:
ip route show default | awk '/default/ {print $5; exit}'
Record the result because it will be used in the WireGuard server configuration.
For the examples below, the interface is assumed to be eth0.
Step 4: Generate the Server Key Pair
Create a secure directory for the WireGuard configuration:
sudo install -d -m 700 /etc/wireguard
Set a restrictive file-creation mask:
umask 077
Generate the server’s private key:
wg genkey | sudo tee /etc/wireguard/server_private.key > /dev/null
Generate the corresponding public key:
sudo cat /etc/wireguard/server_private.key \
  | wg pubkey \
  | sudo tee /etc/wireguard/server_public.key > /dev/null
Verify the file permissions:
sudo ls -l /etc/wireguard/server_*.key
The private key should not be readable by unprivileged users.
Display the server public key:
sudo cat /etc/wireguard/server_public.key
Save this public key. It will be required when configuring the client.
Do not disclose the contents of:
/etc/wireguard/server_private.key
WireGuard uses public-key authentication between peers. Each peer keeps its private key secret and shares only its public key.
Step 5: Enable IPv4 Forwarding
The server must forward packets between the WireGuard interface and the external network interface.
Create a dedicated sysctl configuration file:
sudo nano /etc/sysctl.d/99-wireguard.conf
Add:
net.ipv4.ip_forward = 1
Save the file and apply the setting:
sudo sysctl --system
Verify it:
sysctl net.ipv4.ip_forward
Expected output:
net.ipv4.ip_forward = 1
Using /etc/sysctl.d/99-wireguard.conf is preferable to modifying the main /etc/sysctl.conf file because it keeps the WireGuard-specific setting isolated and easier to manage.
The private key must appear directly in the configuration. Do not enter a file path such as:
PrivateKey = /etc/wireguard/server_private.key
The PrivateKey field expects the key itself, not the name of the file containing it.
Configuration explanation
Address assigns an IP address to the WireGuard interface.
ListenPort specifies the UDP port on which the server listens.
PrivateKey identifies and authenticates the server.
PostUp runs firewall and NAT commands when the interface starts.
PostDown removes those rules when the interface stops.
%i is replaced automatically by the current WireGuard interface name.
MASQUERADE translates VPN client addresses to the server’s external address.
The original configuration used:
Address = 10.0.0.1
It should include a subnet prefix:
Address = 10.8.0.1/24
Without the prefix, interface addressing and route creation may not behave as intended.
Secure the configuration file:
sudo chmod 600 /etc/wireguard/wg0.conf
Check the permissions:
sudo ls -l /etc/wireguard/wg0.conf
Step 7: Configure the Server Firewall
UFW configuration
Check whether UFW is active:
sudo ufw status verbose
Allow WireGuard’s UDP port:
sudo ufw allow 51820/udp
If SSH access is not already permitted, allow it before enabling UFW:
sudo ufw allow OpenSSH
If the SSH service uses a custom port, allow that port instead. For example:
sudo ufw allow 2222/tcp
Allow forwarded traffic from the WireGuard interface to the server’s external interface:
sudo ufw route allow in on wg0 out on eth0
Allow return traffic in the opposite direction:
sudo ufw route allow in on eth0 out on wg0
Replace eth0 with the actual external interface.
Reload UFW:
sudo ufw reload
Check the resulting rules:
sudo ufw status numbered
Ubuntu documents UFW as its standard host firewall management tool.
Cloud firewall configuration
If the server runs on AWS, Azure, Google Cloud, Oracle Cloud, DigitalOcean, Vultr, Linode, or another VPS platform, also allow this inbound rule in the provider’s firewall:
Protocol: UDP
Port: 51820
Source: 0.0.0.0/0
For better security, restrict the source address when the client connects from a known static IP.
Opening the port with UFW does not automatically open it in an external cloud firewall.
Step 8: Validate the Server Configuration
Before starting WireGuard, test the configuration by bringing the interface up manually:
203.0.113.10 with the server’s public IP address or hostname.
For example:
Endpoint = vpn.example.com:51820
Secure the configuration file:
sudo chmod 600 /etc/wireguard/wg0.conf
Client configuration explanation
Address
Address = 10.8.0.2/24
This assigns the client its VPN address.
The original example used:
Address = 10.0.0.2
The subnet prefix should be included.
DNS
DNS = 1.1.1.1
This configures a DNS resolver while the tunnel is active.
Other possible DNS resolvers include:
DNS = 8.8.8.8
or a private DNS server reachable through the VPN.
The DNS directive requires a compatible DNS management utility, commonly resolvconf or systemd-resolved. If wg-quick reports a resolvconf: command not found error, install it:
sudo apt install resolvconf -y
Alternatively, remove the DNS line and manage DNS separately.
Endpoint
Endpoint = 203.0.113.10:51820
This specifies the public IP address or DNS hostname of the VPN server and its UDP listening port.
AllowedIPs
AllowedIPs = 0.0.0.0/0
This creates a full-tunnel IPv4 configuration, causing all IPv4 traffic to use the VPN.
For split tunneling, route only selected networks. For example:
AllowedIPs = 10.8.0.0/24
This sends only traffic destined for the WireGuard VPN network through the tunnel.
To access both the VPN network and a private remote LAN, you could use:
AllowedIPs = 10.8.0.0/24, 192.168.50.0/24
WireGuard’s wg-quick utility can automatically create routes based on the networks listed in AllowedIPs, including special handling for default routes.
PersistentKeepalive
PersistentKeepalive = 25
This is useful when the client is behind NAT or a stateful firewall. It periodically sends an authenticated packet to keep the NAT mapping active.
It is normally configured on the client peer, not on a publicly reachable server.
Part 3: Start and Test the VPN Client
Step 14: Bring Up the Client Interface
Start WireGuard manually:
sudo wg-quick up wg0
Check the interface:
sudo wg show
Check its address:
ip address show wg0
You should see:
inet 10.8.0.2/24
Check the route configuration:
ip route show
Because this is a full-tunnel configuration, wg-quick may use policy routing rather than replacing the visible main default route directly.
Step 15: Verify Connectivity
Test the WireGuard server’s VPN address
From the client:
ping -c 4 10.8.0.1
A successful response confirms that packets can travel through the tunnel.
Check the WireGuard handshake
On either the server or client:
sudo wg show
Look for:
latest handshake
transfer
Example:
latest handshake: 15 seconds ago
transfer: 24.31 KiB received, 18.72 KiB sent
No latest handshake entry usually means that the server and client have not successfully authenticated and exchanged packets.
Verify the client’s public IP address
Before connecting, you can check the client’s normal public IP:
curl -4 https://ifconfig.me
After bringing up WireGuard, run the command again:
curl -4 https://ifconfig.me
The result should now match the public IP address of the WireGuard server.
Test DNS resolution
Run:
getent hosts example.com
You can also test HTTPS connectivity:
curl -I https://example.com
Step 16: Enable WireGuard at Boot on the Client
Enable and start the client interface:
sudo systemctl enable --now wg-quick@wg0
Check its status:
sudo systemctl status wg-quick@wg0 --no-pager
To disable automatic startup later:
sudo systemctl disable wg-quick@wg0
Managing the WireGuard Connection
Disconnect the client
sudo wg-quick down wg0
Reconnect the client
sudo wg-quick up wg0
Restart the systemd service
sudo systemctl restart wg-quick@wg0
Display the current configuration
sudo wg show
Display only WireGuard interfaces
ip link show type wireguard
Monitor handshakes and traffic continuously
watch -n 2 sudo wg show
Ubuntu’s WireGuard troubleshooting documentation also recommends monitoring wg output when diagnosing peer connectivity and handshake issues.
Restart the server interface after editing the configuration:
sudo systemctl restart wg-quick@wg0
Never reuse a private key or VPN IP address across multiple clients.
Optional: Apply Peer Changes Without Interrupting Existing Connections
Restarting wg-quick@wg0 briefly recreates the interface. On a busy VPN server, you may apply peer changes without taking the interface down.
First verify that the configuration does not contain unsupported values:
sudo wg-quick strip wg0
Then synchronize the running WireGuard configuration:
sudo wg syncconf wg0 <(sudo wg-quick strip wg0)
This command requires a shell that supports process substitution, such as Bash.
Alternatively, add a peer directly:
sudo wg set wg0 peer CLIENT_PUBLIC_KEY allowed-ips 10.8.0.2/32
Changes made only with wg set are not automatically written to /etc/wireguard/wg0.conf, so they may be lost after a reboot unless the configuration file is also updated.
Troubleshooting WireGuard
Problem 1: No WireGuard handshake
Run on the server:
sudo wg show
Check whether UDP port 51820 is listening:
sudo ss -lunp | grep 51820
Check UFW:
sudo ufw status numbered
Confirm that the cloud provider’s firewall also allows UDP port 51820.
Check the server logs:
sudo journalctl -u wg-quick@wg0 --no-pager
Check recent logs continuously:
sudo journalctl -u wg-quick@wg0 -f
Common causes include:
An incorrect server endpoint.
TCP port 51820 opened instead of UDP.
A blocked cloud firewall rule.
Incorrect public or private keys.
The server service is not running.
WireGuard is listening on a different port.
The client is using an outdated server public key.
Problem 2: Handshake succeeds, but there is no internet access
Check IP forwarding on the server:
sysctl net.ipv4.ip_forward
It must return:
net.ipv4.ip_forward = 1
Check the NAT rule:
sudo iptables -t nat -L POSTROUTING -n -v
Check forwarding rules:
sudo iptables -L FORWARD -n -v
Confirm that the external interface in wg0.conf is correct:
ip route show default
For example, this rule will not work if the actual external interface is ens3 but the configuration uses eth0:
PostUp = iptables -t nat -A POSTROUTING -s 10.8.0.0/24 -o eth0 -j MASQUERADE
Correct it and restart WireGuard:
sudo systemctl restart wg-quick@wg0
Problem 3: The VPN works by IP address but DNS fails
Test direct IP connectivity:
ping -c 4 1.1.1.1
Then test DNS:
getent hosts example.com
If the first command succeeds but the second fails, the problem is DNS-related.
Check whether the client configuration contains:
DNS = 1.1.1.1
If wg-quick reports that resolvconf is missing, install it:
sudo apt install resolvconf -y
Restart the interface:
sudo wg-quick down wg0
sudo wg-quick up wg0
Problem 4: wg-quick up wg0 reports that the interface already exists
Example error:
wg-quick: `wg0' already exists
Check the interface:
ip link show wg0
Bring it down:
sudo wg-quick down wg0
If that fails, remove the interface manually:
sudo ip link delete wg0
Then start it again:
sudo wg-quick up wg0
Problem 5: The service fails after editing wg0.conf
Check the service status:
sudo systemctl status wg-quick@wg0 --no-pager
View the detailed logs:
sudo journalctl -xeu wg-quick@wg0
Common configuration errors include:
Missing private keys.
Keys containing extra spaces or line breaks.
Invalid IP addresses.
Missing CIDR prefixes.
Duplicate VPN addresses.
Incorrect PostUp or PostDown commands.
A DNS directive without a compatible DNS helper.
A public key mistakenly placed in the PrivateKey field.
Problem 6: SSH disconnects when the VPN client starts
A full-tunnel configuration uses:
AllowedIPs = 0.0.0.0/0
This changes how the client routes internet traffic. If you are configuring WireGuard on a remote machine through SSH, the SSH reply traffic may be redirected through the tunnel.
To test safely, first use split tunneling:
AllowedIPs = 10.8.0.0/24
After confirming that the tunnel works, carefully change it to:
AllowedIPs = 0.0.0.0/0
Always keep an alternative console or recovery method available when changing routes on a remote system.
Security Recommendations
Protect private keys
WireGuard configuration files should be readable only by root:
Never send private keys through email, chat, tickets, logs, or public repositories.
Restrict the VPN port when possible
If clients connect from fixed public IP addresses, restrict UDP port 51820:
sudo ufw delete allow 51820/udp
sudo ufw allow from CLIENT_PUBLIC_IP to any port 51820 proto udp
Do not use this restriction for clients whose public IP addresses change frequently.
Use a separate key for every device
Do not copy one client configuration to several devices. Unique keys make it possible to revoke one device without affecting other users.
Remove unused peers
Delete inactive [Peer] blocks from the server configuration and restart or synchronize the interface.
Keep the operating system updated
Install security updates regularly:
sudo apt update
sudo apt upgrade -y
Do not expose the private key through command history
Avoid placing private keys directly in shell commands. Store them in protected configuration files and verify that those files have restrictive permissions.
sysctl net.ipv4.ip_forward
sudo systemctl status wg-quick@wg0 --no-pager
sudo wg show
sudo ss -lunp | grep 51820
sudo iptables -t nat -L POSTROUTING -n -v
sudo ufw status verbose
On the client, verify:
sudo systemctl status wg-quick@wg0 --no-pager
sudo wg show
ip address show wg0
ping -c 4 10.8.0.1
curl -4 https://ifconfig.me
getent hosts example.com
A working installation should show:
The wg0 interface is active on both systems.
The client and server have a recent WireGuard handshake.
Transfer counters increase when traffic is generated.
The client can reach 10.8.0.1.
DNS resolution works.
The client’s public IPv4 address matches the VPN server when full tunneling is enabled.
Conclusion
You have now installed and configured a WireGuard VPN server and Linux client on Ubuntu, Debian, or Linux Mint.
The server listens for encrypted WireGuard traffic on UDP port 51820, authenticates the client using public keys, forwards client packets and performs NAT through its external network interface. The client uses AllowedIPs = 0.0.0.0/0 to route all IPv4 traffic through the VPN.
For split tunneling, replace the client’s default-route entry with only the private networks that should be reachable through WireGuard.
Running many independent WordPress installations behind one OpenResty/Nginx layer, one PHP-FPM container, and one MySQL instance creates a distinctive failure mode: the server may have abundant free memory while CPU utilization and load average climb until every site becomes slow.
This article documents a production-style investigation of that pattern. The important lesson is not a single tuning value. It is the method: identify which layer is doing work, measure the work by site and request, find the application behavior multiplying it, reduce concurrency amplification, and verify the result with fresh statistics.
1. The Initial Symptom
A typical environment has ample free RAM, a generously sized InnoDB buffer pool, a large PHP-FPM pool, and many independent WordPress sites. Despite the available memory, load average and CPU utilization remain high, with the PHP container appearing to consume most of the CPU.
This is a common point at which administrators make the wrong first move. Increasing memory, increasing pm.max_children, or increasing MySQL caches may make the system less stable because none of those actions answers the key question:
Is the server short of memory, waiting for storage, executing expensive code, or admitting too much concurrent work?
High load is not synonymous with high CPU usage. Linux load includes runnable tasks and tasks blocked in uninterruptible sleep, often storage I/O. Establish the resource bottleneck before tuning either MySQL or PHP.
Do not treat a Docker CPU limit as a performance fix. It is useful for isolation, but it only limits the damage after expensive requests have already entered PHP.
3. Prove Whether MySQL Is the Root Cause or a Victim
WordPress requests often spend a large part of their lifetime waiting on MySQL. Conversely, inefficient WordPress plugin behavior can make both PHP and MySQL busy. The layers must be correlated rather than investigated independently.
3.1 Check active database concurrency
SHOW GLOBAL STATUS WHERE Variable_name IN (
    'Threads_connected',
    'Threads_running',
    'Max_used_connections',
    'Connections'
);

SHOW FULL PROCESSLIST;
Threads_running is more useful than the number of connected or sleeping sessions. If it remains well above the available CPU core count, queries are competing for CPU or other shared resources. Raising max_connections does not resolve this; it permits a larger overload event.
Check locks separately:
SELECT * FROM sys.innodb_lock_waits;

SELECT
    trx_id,
    trx_mysql_thread_id,
    trx_started,
    trx_state,
    trx_rows_locked,
    trx_rows_modified,
    LEFT(trx_query, 300) AS trx_query
FROM information_schema.innodb_trx
ORDER BY trx_started;
3.2 Use statement digests, not isolated slow-query anecdotes
The slow query log finds individually slow statements. Performance Schema digests also reveal inexpensive statements executed millions of times and queries whose aggregate cost dominates the server.
SELECT
    SCHEMA_NAME,
    DIGEST_TEXT,
    COUNT_STAR,
    ROUND(SUM_TIMER_WAIT / 1000000000000, 2) AS total_seconds,
    ROUND(AVG_TIMER_WAIT / 1000000000, 2) AS avg_ms,
    SUM_ROWS_EXAMINED,
    SUM_ROWS_SENT,
    SUM_CREATED_TMP_DISK_TABLES,
    SUM_SORT_ROWS
FROM performance_schema.events_statements_summary_by_digest
WHERE SCHEMA_NAME IS NOT NULL
ORDER BY SUM_TIMER_WAIT DESC
LIMIT 30;
Read the digest table in two dimensions:
High aggregate time: statements that consume the most database capacity overall.
High execution count or rows examined: individually fast statements whose frequency or scan volume makes them expensive.
A query does not need to appear in the slow query log to be a major resource consumer. For example, a 5 ms query executed ten million times consumes far more capacity than an isolated five-second administration query. Likewise, a lookup that returns one row but examines hundreds of thousands usually indicates an unsuitable access path.
When a suspicious digest is found, identify the affected schema, capture the parameterized query shape, inspect the table and indexes, and test the execution plan:
SHOW CREATE TABLE target_table\G
SHOW INDEX FROM target_table;

EXPLAIN ANALYZE
SELECT selected_columns
FROM target_table
WHERE indexed_candidate = 'sample value'
LIMIT 1;
Use EXPLAIN instead of EXPLAIN ANALYZE if executing the statement could be unsafe or excessively expensive. Optimize from actual column types, selectivity, and query patterns rather than adding every filtered column to one large index.
3.3 Read buffer-pool statistics correctly
Collect the relevant status counters:
SHOW GLOBAL STATUS WHERE Variable_name IN (
    'Innodb_buffer_pool_pages_dirty',
    'Innodb_buffer_pool_pages_free',
    'Innodb_buffer_pool_read_requests',
    'Innodb_buffer_pool_reads',
    'Innodb_buffer_pool_wait_free',
    'Innodb_log_waits'
);
With the usual 16 KiB InnoDB page size, free pages can be converted into approximate unused capacity. Physical reads should be compared with logical read requests, while dirty pages, buffer-pool waits, and redo-log waits reveal different forms of pressure.
If the hit rate is already extremely high and many pages remain free, adding more buffer-pool memory will not fix CPU-heavy scans. Data can be fully cached while MySQL still compares a large number of rows on every call. Conversely, do not use hit rate alone: examine waits, working-set size, query plans, and storage latency together.
4. Fix the Application Multiplier Before Tuning Around It
Once an expensive query or request pattern is identified, determine which WordPress component produces it. The source may be core behavior, a theme, a plugin, a scheduled task, an AJAX endpoint, a REST endpoint, or hostile traffic repeatedly invoking valid application code.
Choose the least complex durable correction:
Remove or disable a feature that has no business value.
Reduce how often it runs through caching, batching, or scheduling.
Fix its query shape or add a selective index after plan analysis.
Move long-running work out of web requests and into controlled background jobs.
Rate-limit or block abusive callers before they enter PHP.
Avoid tuning infrastructure merely to preserve wasteful behavior. A query reduced from 500 ms to 50 ms is still expensive if an unnecessary endpoint calls it millions of times.
For shared fixes across independently installed sites, a carefully maintained must-use plugin can enforce common policies from each site’s wp-content/mu-plugins/ directory. Use this only for behavior that is truly universal, document it, and test it against plugin and WordPress upgrades.
Proxy identity is another common multiplier. Applications should prefer a trusted, normalized client address and must not blindly trust client-supplied X-Forwarded-For. Misconfigured proxy chains can duplicate addresses, defeat per-IP controls, and create inconsistent application keys.
In static mode, FPM maintains exactly pm.max_children workers. The settings pm.start_servers, pm.min_spare_servers, and pm.max_spare_servers do not apply.
A very large static pool is not automatically capable of the same number of useful concurrent requests. When requests are CPU-heavy or generate expensive SQL, excessive concurrency creates:
excessive runnable processes and context switching;
contention for CPU caches and memory bandwidth;
a burst of simultaneous MySQL work;
increased tail latency;
a feedback loop in which slow requests occupy workers longer and admit more competing work.
Nginx queueing a short burst is often healthier than allowing hundreds of WordPress requests to execute simultaneously.
An illustrative dynamic-pool starting point for a large server is:
pm.max_requests periodically replaces workers and limits long-term growth caused by extensions or plugin code. request_terminate_timeout prevents a pathological request from occupying a worker indefinitely, but long-running imports and maintenance tasks may require a separate pool or CLI worker rather than a globally larger timeout.
6. Validate and Tune OPcache with Evidence
Inspect OPcache with opcache_get_status(false) and focus on used and free bytecode memory, interned-string capacity, cached script count, restart counters, and JIT utilization. Common warning signs include little free memory, a completely full interned-strings buffer, or a large JIT allocation with negligible use.
The configuration was changed to provide ample bytecode and interned-string capacity and to disable JIT:
These values are examples, not defaults for every host. Size the bytecode memory, interned-strings buffer, and accelerated-file table from measured usage, then leave reasonable growth capacity. A healthy steady state has free space, no recurring OOM or hash restarts, low wasted memory, and enough cached-key capacity for all active sites.
A modest overall hit rate immediately after restart is not evidence of failure. A host with many sites must compile a large number of unique scripts during cache warm-up. The correct test is the incremental hit rate over a stable interval:
incremental hit rate = delta(hits) / (delta(hits) + delta(misses))
Do not keep enlarging OPcache once it has comfortable free space and no restart events. At that point, request behavior and concurrency are the more important CPU targets.
7. Add One PHP-FPM Access Log for Every Site in the Pool
Nginx access logs and PHP-FPM access logs are independent. A per-site Nginx access_log does not override the FPM pool’s access.log.
After real_ip_header has accepted a header only from trusted proxy addresses, $remote_addr should represent the normalized client IP. Avoid repeatedly appending the same address at every proxy layer.
Validate before reloading:
nginx -t
php-fpm -tt
In containers, verify the FPM SAPI configuration rather than assuming CLI php -i reads the same files.
8. Rank URLs by Estimated CPU Time, Not by Summed Percentages
The FPM %C field is the percentage of CPU used by a request during its lifetime. Simply adding percentages across requests is dimensionally wrong: a 100% request lasting 20 ms costs far less CPU than a 40% request lasting 5 seconds.
Estimate CPU time per request as:
CPU milliseconds = duration milliseconds x CPU percent / 100
The following parser ranks host + URI by estimated cumulative CPU time. It expects the exact key-value log format shown above:
awk '
{
    host = uri = "";
    duration_ms = cpu_pct = 0;

    for (i = 1; i <= NF; i++) {
        if ($i ~ /^host=/) {
            host = substr($i, 6);
        } else if ($i ~ /^uri=/) {
            uri = substr($i, 5);
        } else if ($i ~ /^duration=/) {
            value = substr($i, 10);
            sub(/ms$/, "", value);
            duration_ms = value + 0;
        } else if ($i ~ /^cpu=/) {
            value = substr($i, 5);
            sub(/%$/, "", value);
            cpu_pct = value + 0;
        }
    }

    if (host != "" && uri != "") {
        key = host " " uri;
        cpu_ms[key] += duration_ms * cpu_pct / 100;
        wall_ms[key] += duration_ms;
        requests[key]++;
    }
}
END {
    for (key in requests) {
        printf "%.0f\t%d\t%.1f\t%.0f\t%s\n", \
            cpu_ms[key], \
            requests[key], \
            cpu_ms[key] / requests[key], \
            wall_ms[key] / requests[key], \
            key;
    }
}' /var/log/php/fpm.access.log \
| sort -t $'\t' -k1,1nr \
| head -50
The columns are:
estimated_cpu_ms requests avg_cpu_ms avg_wall_ms host URI
Use a similar aggregation by host to find the sites consuming the most PHP CPU:
awk '
{
    host = ""; duration_ms = cpu_pct = 0;
    for (i = 1; i <= NF; i++) {
        if ($i ~ /^host=/) host = substr($i, 6);
        else if ($i ~ /^duration=/) {
            v = substr($i, 10); sub(/ms$/, "", v); duration_ms = v + 0;
        } else if ($i ~ /^cpu=/) {
            v = substr($i, 5); sub(/%$/, "", v); cpu_pct = v + 0;
        }
    }
    if (host != "") {
        cpu_ms[host] += duration_ms * cpu_pct / 100;
        requests[host]++;
    }
}
END {
    for (host in requests)
        printf "%.0f\t%d\t%.1f\t%s\n", \
            cpu_ms[host], requests[host], cpu_ms[host]/requests[host], host;
}' /var/log/php/fpm.access.log \
| sort -t $'\t' -k1,1nr \
| head -30
These are estimates based on FPM’s reported average CPU percentage, but they are much more meaningful than sorting single requests or summing percentages.
Normalize query strings when appropriate. Otherwise tracking parameters and search terms may split one endpoint into thousands of keys. Conversely, keep query strings when a particular parameter is suspected of triggering expensive behavior.
9. Correlate Expensive URLs with Slow Stacks
The FPM access log answers which host and URI consumed resources. The FPM slow log helps answer which PHP code path was active:
Look for plugin and theme paths in backtraces. Common expensive WordPress endpoints include:
/wp-cron.php;
/wp-admin/admin-ajax.php;
/xmlrpc.php;
REST endpoints under /wp-json/;
search, filtering, and uncached product pages;
form submission, search, filtering, and reporting endpoints.
Slow wall time does not always mean high CPU. A request with low estimated CPU time but long duration is probably waiting on MySQL, storage, DNS, an external API, or a lock. A request with both high CPU time and high wall time is a stronger candidate for expensive PHP execution.
10. Reduce How Often Requests Reach PHP
FPM tuning controls the blast radius; it does not eliminate unnecessary executions. For mostly anonymous WordPress sites, the most effective CPU optimization is often full-page caching at Nginx, OpenResty, or the CDN.
disabling visitor-triggered WP-Cron and scheduling it from the system;
staggering cron execution across many sites instead of starting all jobs on the same minute;
auditing Action Scheduler backlogs and high-frequency hooks;
using persistent object caching where it measurably reduces repeat database work;
rate-limiting abusive endpoints before PHP;
applying bot controls at Cloudflare or Nginx, with carefully maintained allowlists;
disabling or replacing plugins whose per-request work has little business value.
In the database digests, Action Scheduler lookups were individually fast but executed more than 160 million times. High-frequency cheap calls may not lead the aggregate-time table, yet they reveal a large background-work volume worthy of separate investigation.
11. Logging and Proxy Configuration Pitfalls
Nginx and FPM logs do not override each other
An access_log inside a server block overrides inherited Nginx access logs at the http level for that server, unless multiple destinations are explicitly declared. It does not affect PHP-FPM’s access.log.
Keeping per-site Nginx logs plus one shared FPM log is a useful arrangement:
Log
Primary use
Per-site Nginx access log
Traffic, bots, status codes, total and upstream time
Headers declared with proxy_set_header apply to proxy_pass. They do not automatically become FastCGI parameters. Values required by PHP must be supplied with fastcgi_param, preferably in a common include used by all sites.
Rotate the shared FPM log
A global log for many sites can grow rapidly. Configure rotation in the host or container logging system. A simple logrotate policy might use daily rotation, compression, seven retained files, and a safe FPM reopen signal. copytruncate is convenient but can lose a small number of lines and imposes copying overhead on large files; signaling FPM to reopen the log is preferable when supported by the deployment.
12. A Reliable Verification Loop
Performance Schema and OPcache counters are cumulative. Old values remain after a fix and can make successful changes look ineffective.
Use a controlled before-and-after process:
Record OS, FPM, MySQL, and OPcache baselines.
Make one logically related change set.
Validate configuration syntax.
Restart or reload only the required service.
Reset the relevant performance summary or record counter deltas.
Observe through a representative traffic interval.
Compare request rate, CPU time, latency, error rate, FPM queueing, and database work.
This does not delete application data. After waiting through a representative traffic interval, query the digest table again and compare the new aggregate time, execution count, rows examined, temporary tables, and sort work with the baseline.
For PHP-FPM, monitor:
listen queue
max listen queue
active processes
idle processes
max active processes
max children reached
slow requests
Do not automatically raise pm.max_children when max children reached increases. If CPUs are already saturated, more workers usually increase contention. First determine whether queueing comes from insufficient capacity or slow and unnecessary requests.
13. Recommended Incident Order of Operations
For this class of multi-site WordPress incident, the following order minimizes guesswork:
Classify CPU, I/O, swapping, or lock pressure with OS metrics.
Identify the busiest container and processes.
Inspect MySQL active threads, locks, and aggregate statement digests.
Fix, cache, reschedule, rate-limit, or disable the dominant application behavior.
Reduce excessive PHP-FPM concurrency to a measured starting point.
Verify OPcache capacity and disable unhelpful JIT for WordPress workloads.
Add one structured FPM access log for the shared pool.
Rank sites and URLs by estimated CPU time, request volume, and wall time.
Correlate expensive requests with FPM slow-log stacks.
Reset or delta the counters and verify the improvement under real traffic.
Conclusion
In this class of incident, insufficient RAM is often not the central problem. High-frequency application work, excessive PHP concurrency, and weak request-level attribution combine to make every layer appear overloaded at once.
The durable solution combined application, database, runtime, and observability changes:
remove unnecessary work and optimize the remaining query and request paths;
prevent PHP concurrency from overwhelming CPU and MySQL;
size OPcache from measured usage and interpret post-restart misses as warm-up;
log every FPM request with host, URI, duration, memory, and CPU percentage;
rank URLs using estimated CPU time rather than summed percentages;
keep anonymous requests out of PHP through caching and edge controls;
verify every change with fresh or delta-based counters.
That method scales beyond WordPress. Whenever a shared application runtime hosts many tenants, aggregate cost and concurrency amplification matter more than isolated slow requests—and observability must preserve the tenant and endpoint dimensions needed to find them.
Running WordPress behind an Nginx reverse proxy requires more than simply forwarding requests to another server. When the site is published under a subdirectory such as /news, the proxy must preserve the request path, pass the original protocol and hostname, and safely restore the visitor’s real IP address.
This guide explains how to expose a WordPress installation at:
https://example.com/news/
while WordPress is hosted on a separate backend server.
Architecture Overview
This setup uses two servers.
Server A: Public Reverse Proxy
Accepts public HTTP and HTTPS traffic
Terminates TLS connections
Redirects HTTP traffic to HTTPS
Proxies requests under /news/ to Server B
Passes the original hostname, protocol, and client IP information
Server B: WordPress Backend
Hosts the WordPress files
Runs Nginx and PHP-FPM
Accepts traffic from Server A
Restores the real client IP from trusted proxy headers
Recognizes that the original request used HTTPS
The public WordPress URL will be:
https://example.com/news/
This guide assumes that WordPress is installed under the /news directory on Server B. For example:
/var/www/example.com/news/
Important Nginx Proxy Path Rule
Nginx handles proxy_pass differently depending on whether the upstream address includes a URI path.
This preserves the public hostname, such as example.com.
WordPress uses the hostname when generating redirects, canonical URLs, administration URLs, media URLs, and other links.
Forward the Original Protocol
proxy_set_header X-Forwarded-Proto $scheme;
This tells Server B whether the original visitor used HTTP or HTTPS.
Although Server A may connect to Server B over HTTP, the browser connection can still use HTTPS. WordPress must know the original protocol to avoid redirect loops, insecure cookies, and mixed-content URLs.
X-Real-IP contains the address that connected directly to Server A.
X-Forwarded-For maintains the complete proxy chain by appending the current client IP to any existing forwarded addresses.
Server B must trust these headers only when the request comes from Server A.
Why proxy_redirect Is Usually Unnecessary
Older reverse-proxy examples often include a directive similar to this:
proxy_redirect http://B_SERVER_IP/news/ /news/;
This rule is normally unnecessary when:
The original Host header is preserved
WordPress home and siteurl use the public HTTPS URL
WordPress correctly detects the forwarded HTTPS protocol
It is generally better to correct URL generation at the WordPress and proxy-header level than to rewrite backend redirects manually.
If Server B still returns redirects containing its private IP address or internal hostname, verify the WordPress URL settings and forwarded headers before adding a custom proxy_redirect rule.
Test and Reload Nginx on Server A
sudo nginx -t
If the configuration test succeeds, reload Nginx:
sudo systemctl reload nginx
A reload is normally preferable to a restart because it applies the new configuration without abruptly terminating active connections.
Step 2: Configure Real Client IP Handling on Server B
Without additional configuration, Server B sees Server A as the direct client.
Use the Nginx Real IP module to restore the original visitor IP address safely.
Verify the Nginx Real IP Module
nginx -V 2>&1 | grep -o 'http_realip_module'
If the module is available, the command should return:
http_realip_module
Most standard Nginx packages include this module.
Trust Only Server A
Add the following directives inside the Nginx http block on Server B:
Replace A_SERVER_IP with the address that Server A uses to connect to Server B.
For example:
set_real_ip_from 10.10.0.10;
If the servers communicate over IPv6, add the trusted IPv6 address as well:
set_real_ip_from 2001:db8::10;
Do Not Trust All IP Addresses
Avoid unrestricted configurations such as:
set_real_ip_from 0.0.0.0/0;
If Server B is reachable by untrusted clients, an attacker could submit a forged X-Forwarded-For header and impersonate another IP address.
Only Server A and other known reverse proxies should be permitted to supply trusted client IP headers.
How real_ip_recursive Works
real_ip_recursive on;
When multiple trusted proxies are involved, this setting instructs Nginx to examine the forwarded IP chain and select the last address that does not belong to a trusted proxy.
It is also safe in a single-proxy architecture when the trusted proxy list is configured correctly.
Step 3: Configure Nginx on Server B
Because Server A preserves the original Host header, the backend virtual host should recognize example.com.
A basic WordPress backend configuration may look like this:
Adjust the PHP-FPM socket for the PHP version installed on Server B.
Common examples include:
/run/php/php8.3-fpm.sock
/run/php/php8.4-fpm.sock
PHP-FPM may also listen on a TCP port:
fastcgi_pass 127.0.0.1:9000;
Expected WordPress Directory Structure
With this configuration, WordPress should be installed at:
/var/www/example.com/news/
The WordPress front controller should therefore be:
/var/www/example.com/news/index.php
Test and Reload Nginx on Server B
sudo nginx -t
sudo systemctl reload nginx
Step 4: Make WordPress Recognize Forwarded HTTPS
Server B receives an HTTP request from Server A even though the visitor connected to Server A over HTTPS.
Without additional handling, WordPress may believe that the request is insecure. This can cause:
Infinite HTTPS redirect loops
HTTP administration URLs
Mixed-content warnings
Incorrect canonical URLs
Login and cookie problems
Add the following code to wp-config.php before WordPress loads wp-settings.php.
// Trust the forwarded protocol only when the request comes from Server A.
$trusted_proxy_ips = [
    'A_SERVER_IP',
];

if (
    in_array($_SERVER['REMOTE_ADDR'] ?? '', $trusted_proxy_ips, true)
    && isset($_SERVER['HTTP_X_FORWARDED_PROTO'])
) {
    $forwarded_proto = strtolower(
        trim(explode(',', $_SERVER['HTTP_X_FORWARDED_PROTO'])[0])
    );

    if ($forwarded_proto === 'https') {
        $_SERVER['HTTPS'] = 'on';
        $_SERVER['SERVER_PORT'] = 443;
    }
}
Replace A_SERVER_IP with the actual address of Server A.
This is not recommended when Nginx is already configured with the Real IP module.
Nginx should validate the trusted proxy and restore the real client IP before PHP receives the request.
After the backend Nginx configuration is correct, this PHP variable should already contain the visitor IP:
$_SERVER['REMOTE_ADDR']
Directly trusting X-Real-IP or X-Forwarded-For inside PHP can create an IP spoofing vulnerability when Server B is reachable without passing through Server A.
Step 5: Configure the Public WordPress URLs
The WordPress Address and Site Address should both use the public HTTPS URL.
In the WordPress dashboard, open:
Settings → General
Set the following values:
WordPress Address (URL): https://example.com/news
Site Address (URL):      https://example.com/news
Define the URLs in wp-config.php
You may explicitly define the public URLs in wp-config.php:
This prevents the URLs from being changed through the WordPress dashboard and ensures that WordPress consistently generates the correct public address.
Do not add a trailing slash to these values.
Update the URLs with WP-CLI
cd /var/www/example.com/news

wp option update home 'https://example.com/news'
wp option update siteurl 'https://example.com/news'
Update the URLs with SQL
UPDATE wp_options
SET option_value = 'https://example.com/news'
WHERE option_name IN ('home', 'siteurl');
The database table prefix may not be wp_, so verify the actual options table name before running the query.
Step 6: Restrict Direct Access to Server B
Whenever possible, Server B should accept web traffic only from Server A.
This can be enforced with:
A private network
A cloud security group
nftables
iptables
UFW or another host firewall
Nginx access-control directives
For example, inside the backend server block:
allow A_SERVER_IP;
deny all;
Be careful to allow any monitoring services, health checks, deployment systems, or trusted administration addresses that also require access.
A firewall rule is generally stronger than an Nginx access rule because it blocks unwanted traffic before it reaches the web server.
This is only a starting point. Websites using WooCommerce, membership systems, multilingual plugins, dynamic personalization, or authentication integrations require additional cache exclusions.
Production Configuration Checklist
https://example.com/news/ loads successfully
/news redirects once to /news/
Server A preserves the original request URI
The original Host header reaches Server B
WordPress detects the forwarded HTTPS protocol
home and siteurl use the public HTTPS URL
Server B trusts forwarded IP headers only from Server A
Direct backend access is restricted where possible
WordPress login and administration pages are not cached
Backend IP addresses do not appear in redirects or page source
Nginx logs on Server B contain the real visitor IP address
Conclusion
A reliable WordPress reverse-proxy setup depends on consistent handling across every layer.
Server A must preserve the public hostname, request path, protocol, and client IP chain. Server B must trust only known proxies and use the Nginx Real IP module to restore the visitor address. WordPress must recognize the forwarded HTTPS protocol and generate URLs containing the correct /news prefix.
With these elements configured correctly, WordPress can operate securely and predictably behind Nginx while remaining publicly accessible at:
Creating files with a specific size is useful for testing file uploads, validating storage limits, simulating large datasets, and performing basic disk I/O tests.
Linux commonly uses tools such as dd, truncate, and fallocate. Windows provides the built-in fsutil command, which can create a file with an exact size without requiring third-party software.
This guide explains how to create files of arbitrary sizes on both Windows and Linux.
Creating a File of a Specific Size on Windows
Windows includes the fsutil command-line utility for managing file systems and performing advanced file operations.
To create a file with a specific size, use:
fsutil file createnew <filename> <size-in-bytes>
The size must be specified in bytes.
Example: Create a 500 MiB File
A binary megabyte, more precisely called a mebibyte or MiB, contains 1,048,576 bytes.
Therefore:
500 × 1,048,576 = 524,288,000 bytes
Run the following command in Command Prompt:
fsutil file createnew 500MiB.dat 524288000
Example output:
File 500MiB.dat is created
You can verify the file size with:
dir 500MiB.dat
Administrator Permissions
Depending on the Windows version, destination directory, and security configuration, fsutil may require an elevated Command Prompt.
To run it with administrative privileges:
Open the Start menu.
Search for Command Prompt.
Select Run as administrator.
Execute the fsutil command.
Creating Files with PowerShell
PowerShell also provides convenient ways to create files with exact sizes.
A file created with fsutil file createnew usually appears empty when opened in a normal text editor. This is because the file does not contain readable text.
When the file is read, its contents are generally returned as null bytes:
00 00 00 00 00 00 00 00 00 00 00 00 00 00 00 00
In a hexadecimal editor, the beginning of the file may appear similar to:
A null byte has the hexadecimal value 00. It is not the same as an ASCII space, whose hexadecimal value is 20.
Because text editors do not render null bytes as visible characters, the file may look blank even though it has the requested size.
The file extension does not determine the actual file format. Naming a file 500MiB.zip does not make it a valid ZIP archive. For test files, extensions such as .dat, .bin, or .test are usually clearer.
Creating a File of a Specific Size on Linux
Linux provides several methods for creating files with exact sizes. The best command depends on whether you need to write real data or only reserve a logical file size.
if=/dev/zero Uses /dev/zero as the input source. It continuously generates null bytes.
of=500MiB.dat Specifies the output file.
bs=1M Sets the block size to 1 MiB.
count=500 Writes 500 blocks.
status=progress Displays progress information while the file is being written.
The resulting file size is:
1 MiB × 500 = 500 MiB
You can verify it with:
ls -lh 500MiB.dat
For the exact byte count, use:
stat --format='%n: %s bytes' 500MiB.dat
Method 2: Create a File Quickly with truncate
If you only need a file with a specific logical size, use truncate:
truncate -s 500M 500MiB.dat
Verify the result:
ls -lh 500MiB.dat
truncate changes the logical file size without necessarily writing data across the entire file. Depending on the file system, the resulting file may be sparse and may consume much less physical disk space than its apparent size.
Compare the logical and physical sizes with:
ls -lh 500MiB.dat
du -h 500MiB.dat
ls -lh shows the apparent file size.
du -h shows the actual allocated disk space.
Because truncate may create a sparse file, it is generally unsuitable for measuring sequential disk write performance.
Method 3: Allocate Disk Space with fallocate
On supported Linux file systems, fallocate can reserve disk space efficiently:
fallocate -l 500M 500MiB.dat
This is usually much faster than writing 500 MiB of zeroes with dd.
Verify the file:
ls -lh 500MiB.dat
du -h 500MiB.dat
Unlike truncate, fallocate normally allocates physical disk blocks immediately. However, its behavior depends on the file system and storage environment.
Creating Files with Decimal or Binary Units
Storage sizes can be expressed using decimal or binary units.
Unit
Size in bytes
1 KB
1,000 bytes
1 MB
1,000,000 bytes
1 GB
1,000,000,000 bytes
1 KiB
1,024 bytes
1 MiB
1,048,576 bytes
1 GiB
1,073,741,824 bytes
Some operating-system tools display binary-sized values using labels such as KB, MB, or GB. Therefore, always check the command’s unit conventions when the exact byte count matters.
However, generating random data consumes more CPU than reading from /dev/zero.
On Windows, PowerShell can generate random content, but generating hundreds of megabytes cryptographically can be slow and memory-intensive. For large performance-testing workloads, a dedicated benchmarking tool is preferable.
Which Method Should You Use?
Operating system
Command
Writes the entire file
Typical use
Windows
fsutil file createnew
Not suitable as a controlled write benchmark
Quickly create an exact-size file
Windows
PowerShell SetLength()
No
Application and file-size testing
Linux
dd if=/dev/zero
Yes
Basic sequential write testing
Linux
truncate
No
Quickly create a logical-size or sparse file
Linux
fallocate
Usually allocates blocks without writing all data
Reserve disk space quickly
Linux
dd if=/dev/urandom
Yes
Create incompressible test data
Important Considerations for Disk I/O Testing
Although dd is frequently used for quick disk tests, it is not a complete storage benchmark.
Results can be affected by:
Operating-system page cache
File-system caching
RAID controller cache
Storage-device write cache
Compression and deduplication
Sparse-file allocation
Block size
Concurrent workloads
Virtual-machine or container storage layers
For a more controlled Linux write test, direct I/O may be used:
Direct I/O support depends on the file system, storage device, alignment, and operating environment.
For serious storage benchmarking, use purpose-built tools such as:
fio on Linux and Windows
DiskSpd on Windows
CrystalDiskMark on Windows
These tools can measure random and sequential workloads, queue depth, latency, IOPS, throughput, and mixed read/write performance more accurately than basic file-creation commands.
Practical Use Cases
Files with predetermined sizes can be used for:
Upload Limit Testing
Verify whether web servers, APIs, reverse proxies, and application frameworks correctly enforce upload-size limits.
Storage Capacity Testing
Confirm that an application handles low-space conditions and large-file operations properly.
Network Transfer Testing
Measure approximate file-transfer speed between systems.
Compression Testing
Compare compression ratios using zero-filled, repeated-pattern, and random-content files.
Backup and Restore Testing
Validate backup software behavior when handling large files.
Application Development
Test progress bars, timeout handling, multipart uploads, checksums, and resumable transfers.
Cleaning Up Test Files
Delete the test file after use to recover disk space.
On Windows:
del 500MiB.dat
In PowerShell:
Remove-Item .\500MiB.dat
On Linux:
rm -f 500MiB.dat
Before creating a large file, check the available disk space to avoid filling the file system.
On Windows:
Get-PSDrive -PSProvider FileSystem
On Linux:
df -h
Conclusion
Windows and Linux both provide built-in tools for creating files with exact sizes.
On Windows, use:
fsutil file createnew 500MiB.dat 524288000
On Linux, use dd when you need to write actual zero-filled data:
Use truncate when only the logical file size matters:
truncate -s 500M 500MiB.dat
Use fallocate when you want to reserve disk space efficiently:
fallocate -l 500M 500MiB.dat
The correct method depends on whether you need an exact logical size, physically allocated storage, real written data, random content, or reliable disk-performance measurements.
ChatGPT can support many time-consuming SEO tasks, including keyword research, content planning, on-page optimization, content refreshing, link building, and readability improvement.
However, the quality of the result depends heavily on the prompt. A vague instruction such as “write an SEO article” often produces generic content. A stronger prompt defines the target keyword, audience, search intent, structure, tone, length, and expected output format.
Below are practical ChatGPT prompts that you can adapt to your own website, client project, or content workflow.
Before Using ChatGPT for SEO
ChatGPT should be treated as an SEO assistant rather than a replacement for professional judgment.
Always review AI-generated content for:
Factual accuracy
Search intent alignment
Originality
Natural keyword usage
Brand voice
Outdated information
Unsupported statistics or claims
You should also verify keyword data, search volume, rankings, backlinks, and competitor information with appropriate SEO tools. ChatGPT may help organize and interpret data, but it should not invent current search metrics.
For developers or website owners who want to automate content-related tasks without immediately paying for a commercial AI API, see these guides:
These services can be useful for testing SEO tools, content assistants, WordPress integrations, and small automation projects. Free access, model availability, and usage limits may change, so they are generally better suited to experimentation and prototyping than critical production systems.
1. SEO Content Outline Prompts
A detailed outline helps ensure that an article covers the topic comprehensively without becoming repetitive.
Prompt: Create a Competitor-Based SEO Outline
Analyze the top-ranking pages for the keyword “[TARGET KEYWORD]” and create a detailed outline for a 2,000-word article.

Include:

- The likely search intent
- A recommended H1
- Relevant H2 and H3 headings
- Suggested word count for each section
- Important subtopics covered by competing pages
- Missing angles that could make the article more useful
- A conclusion
- An FAQ section based on common search questions

Keep the headings natural and descriptive. Do not repeat the exact target keyword unnaturally in every heading.

Split the outline into Part 1 and Part 2.
If your AI tool has browsing access, you can request an analysis of current search results. Without browsing access, provide the competing page titles, URLs, or extracted headings yourself.
Prompt: Create a Beginner-Friendly Outline
Create an SEO content outline for a beginner’s guide to yoga.

The article should cover:

- What yoga is
- Basic yoga poses
- Physical and mental benefits
- Common beginner mistakes
- Safety tips
- A simple weekly routine

Target keyword: “yoga for beginners”

Also provide:

- Five SEO title options
- A meta description under 155 characters
- Suggested H2 and H3 headings
- Relevant FAQs
- Recommended internal-link topics
2. Keyword Research Prompts
ChatGPT can help generate seed keywords and organize ideas, but it cannot reliably provide current search volume, competition, or ranking difficulty unless connected to a live data source.
Prompt: Generate Related Keywords
Generate a comprehensive list of keywords related to “[TARGET KEYWORD].”

Organize them into:

- Primary keywords
- Secondary keywords
- Long-tail keywords
- Question-based keywords
- Informational keywords
- Commercial keywords
- Transactional keywords
- Related entities and concepts

Remove obvious duplicates and group keywords with the same search intent.
Prompt: Build Keyword Clusters
Group the following keywords into topical clusters based on search intent and semantic similarity:

[PASTE KEYWORD LIST]

For each cluster, provide:

- A suggested pillar-page topic
- Supporting article ideas
- Primary keyword
- Secondary keywords
- Search intent
- Recommended content format

Flag keywords that are likely to compete with one another if published as separate pages.
Prompt: Find Long-Tail Keywords
Generate 30 long-tail keyword ideas related to “[TARGET TOPIC].”

Focus on keywords that indicate:

- A specific problem
- A comparison
- A beginner question
- A purchasing decision
- A local requirement
- A use case

Do not provide estimated search volume unless verified data is available.
3. SEO Topic Ideation Prompts
Use these prompts when planning a content calendar or identifying supporting topics around a core service.
Prompt: Generate Article Ideas
Suggest five high-potential SEO article topics for a yoga studio.

Core topics:

- Home yoga workouts
- Yoga for flexibility

For each topic, include:

- Suggested title
- Primary keyword
- Related long-tail keywords
- Search intent
- Target audience
- Recommended article angle
- Suggested call to action
Prompt: Find Content Gaps
I have already published articles about the following topics:

[PASTE EXISTING ARTICLE TITLES]

My main service or product is:

[DESCRIBE SERVICE]

Identify 15 relevant content gaps.

Exclude topics that substantially overlap with my existing articles. Group the recommendations by awareness, consideration, and conversion-stage search intent.
4. Search Intent Analysis Prompts
Understanding why someone searches for a keyword is more important than repeating the keyword throughout the page.
Prompt: Classify Search Intent
Analyze the likely search intent behind the keyword “[TARGET KEYWORD].”

Determine whether the primary intent is:

- Informational
- Navigational
- Commercial investigation
- Transactional
- Local

Explain what the user is probably trying to accomplish, what content format would best satisfy the query, and which sections should appear near the top of the page.
Prompt: Compare Similar Keywords
Compare the search intent of these keywords:

- [KEYWORD 1]
- [KEYWORD 2]
- [KEYWORD 3]

Explain whether they should target one page or separate pages.

Consider:

- Intent overlap
- Expected content format
- Audience stage
- Risk of keyword cannibalization
- Recommended internal-link relationship
5. SEO Content Writing Prompts
For better results, generate articles section by section instead of requesting an entire long-form article in one response.
Prompt: Write an Article Section
Write the section titled “[SECTION HEADING]” for an article targeting “[TARGET KEYWORD].”

Requirements:

- Audience: [TARGET AUDIENCE]
- Search intent: [SEARCH INTENT]
- Length: approximately [WORD COUNT] words
- Tone: [TONE]
- Include practical details and examples
- Use the target keyword only where natural
- Incorporate these related terms when relevant: [RELATED TERMS]
- Avoid generic introductions, filler, repetition, and unsupported claims
- Do not write the conclusion or sections outside this heading
Prompt: Improve Experience and Credibility
Review the following article and identify places where it could demonstrate stronger practical experience, expertise, and trustworthiness:

[PASTE ARTICLE]

Recommend specific improvements, such as:

- First-hand observations
- Original examples
- Clearer methodology
- Expert review
- Source attribution
- Author credentials
- Limitations or risks
- Updated screenshots or test results

Do not invent personal experience, qualifications, customer results, or statistics.
6. On-Page SEO Optimization Prompts
Avoid rigid keyword-density targets. A fixed instruction such as “use the keyword at exactly 3% density” can make an article repetitive and unnatural.
A better approach is to optimize for relevance, semantic coverage, and readability.
Prompt: Optimize an Existing Draft
Optimize the following article for the keyword “yoga for flexibility” without keyword stuffing:

[PASTE DRAFT]

Improve:

- Search intent alignment
- Title and introduction
- Heading structure
- Natural use of the primary keyword
- Related terminology
- Long-tail keyword coverage
- Paragraph length
- Readability
- Internal-link opportunities
- FAQ coverage

Preserve accurate and useful information. Highlight any statements that require fact-checking.
Prompt: Create SEO Metadata
Create five optimized title tags and three meta descriptions for the following page:

Page topic: [TOPIC]

Primary keyword: [KEYWORD]

Audience: [AUDIENCE]

Search intent: [INTENT]

Keep title tags concise and distinct. Keep each meta description under approximately 155 characters and include a clear benefit without using clickbait.
Prompt: Improve Heading Structure
Review the headings below and reorganize them into a logical H1, H2, and H3 hierarchy:

[PASTE HEADINGS]

Fix:

- Duplicate headings
- Unclear hierarchy
- Missing subtopics
- Keyword stuffing
- Headings that do not match the section content

Return the revised heading structure only.
7. Readability and Editing Prompts
AI is particularly useful for simplifying difficult writing and removing repetitive phrasing.
Prompt: Simplify Complex Content
Rewrite the following content for a general audience at approximately a seventh- to eighth-grade reading level:

[PASTE CONTENT]

Use:

- Shorter sentences
- Familiar words
- Clear transitions
- Short paragraphs
- Direct explanations

Preserve technical accuracy and define any specialist terms that cannot be removed.
Prompt: Improve Awkward Writing
Edit the following draft to improve clarity, flow, and natural phrasing:

[PASTE DRAFT]

Remove:

- Repetition
- Unnecessary filler
- Awkward transitions
- Excessive passive voice
- Generic AI-style phrases

Preserve the original meaning, factual claims, and tone.
Prompt: Make Content More Engaging
Improve the following article by suggesting appropriate places to add:

- Two verified statistics
- One simple analogy
- One practical example
- One short checklist
- An FAQ section

[PASTE ARTICLE]

Do not invent statistics. Clearly mark where an external source is required.
8. Internal Linking Prompts
Internal links help users discover related content and help search engines understand the relationship between pages.
Prompt: Find Internal-Link Opportunities
Review the following article and identify internal-link opportunities:

[PASTE ARTICLE]

Available pages:

[PASTE PAGE TITLES AND URLS]

Return a table containing:

- Source sentence or section
- Recommended destination page
- Natural anchor text
- Reason the link is relevant

Avoid using the same anchor text repeatedly and do not suggest irrelevant links.
Prompt: Build a Topic-Cluster Linking Plan
Create an internal-linking plan for the following pillar page and supporting articles:

Pillar page: [TITLE AND URL]

Supporting pages:

[LIST TITLES AND URLS]

Explain which pages should link to one another and recommend descriptive anchor text. Prioritize useful navigation rather than adding links solely for SEO.
9. External Link and Source Prompts
External links should support factual claims and direct readers to authoritative resources.
Prompt: Recommend External Sources
Recommend three authoritative external sources for an article about “[TOPIC].”

The sources should:

- Support important factual claims
- Come from primary or highly trusted organizations
- Not directly compete with the article’s main commercial objective
- Be current where recency matters

For each source, provide:

- The organization or publication
- The type of information it supports
- Recommended anchor text
- The section where it should be cited

Do not invent URLs or sources.
10. Link-Building Prompts
ChatGPT can help personalize outreach, but mass-produced emails usually perform poorly.
Prompt: Create a Personalized Outreach Email
Write a concise outreach email to the editor of “[WEBSITE NAME].”

I want to recommend my resource:

[RESOURCE TITLE AND URL]

Relevant page on their website:

[PAGE TITLE AND URL]

Explain specifically why my resource would add value for their readers. Do not use exaggerated praise, pressure, or generic phrases. Keep the email under 150 words.
Prompt: Find Linkable Asset Ideas
Suggest ten linkable asset ideas for a website in the “[INDUSTRY]” industry.

Include a mix of:

- Original research
- Calculators
- Templates
- Checklists
- Interactive tools
- Data visualizations
- Technical reference materials

For each idea, explain who might link to it and why.
11. FAQ Generation Prompts
FAQs should answer real user questions, not merely create extra keyword-heavy text.
Prompt: Generate Useful FAQs
Generate ten FAQs for an article targeting “[TARGET KEYWORD].”

Focus on:

- Common beginner questions
- Important limitations
- Costs
- Safety concerns
- Comparisons
- Implementation questions

Provide concise answers of 40–80 words. Avoid repeating information already covered in the main article.
12. Content Repurposing Prompts
One well-researched article can be adapted for several channels, but each version should match the platform.
Prompt: Create a Social Summary
Create a concise social media summary of the following article:

[PASTE ARTICLE]

Platform: X/Twitter

Maximum length: 100 words

Include:

- The main benefit
- One practical takeaway
- A reason to read the full article

Do not use misleading claims or excessive hashtags.
Prompt: Convert an Article into a Newsletter
Convert the following article into an email newsletter:

[PASTE ARTICLE]

Use:

- A concise opening
- Three key takeaways
- One practical recommendation
- A natural call to action

Keep the newsletter under 500 words and avoid copying the article introduction word for word.
13. Content Refresh Prompts
Older pages often lose traffic because examples, screenshots, tools, product details, or search intent have changed.
Prompt: Create a Content Refresh Plan
Review the following article and create a content refresh plan:

[PASTE ARTICLE]

Identify:

- Potentially outdated information
- Broken or weak references
- Missing subtopics
- Sections that are too thin
- Repetitive sections
- Opportunities for updated examples
- New FAQs
- Internal-link opportunities
- Claims requiring current verification

Prioritize the recommendations by expected impact.
14. Technical SEO Explanation Prompts
ChatGPT can explain technical SEO concepts or help analyze supplied data, but important changes should be tested before implementation.
Prompt: Explain a Technical SEO Problem
Explain the following technical SEO issue in clear language:

[DESCRIBE ISSUE]

Include:

- What the issue means
- Common causes
- How it can affect crawling, indexing, or rankings
- How to diagnose it
- Possible fixes
- Risks to consider before making changes

Provide separate recommendations for WordPress and custom-built websites where applicable.
Prompt: Review Robots.txt
Review the following robots.txt file:

[PASTE ROBOTS.TXT]

Identify directives that may accidentally block important pages, CSS, JavaScript, images, or search-engine crawlers.

Explain each problem and provide a corrected version. Do not assume that robots.txt can remove already indexed pages from search results.
A Reusable Master Prompt for SEO Content
The following template can be adapted to most SEO writing projects:
Act as an experienced SEO content strategist and editor.

Create a detailed article about “[TOPIC]” targeting the primary keyword “[PRIMARY KEYWORD].”

Project details:

- Audience: [AUDIENCE]
- Search intent: [INTENT]
- Country or market: [MARKET]
- Desired length: [WORD COUNT]
- Tone: [TONE]
- Business goal: [GOAL]

Requirements:

1. Recommend an SEO title and meta description.
2. Create a logical H1, H2, and H3 structure.
3. Cover the topic comprehensively without unnecessary repetition.
4. Use the primary keyword and related terminology naturally.
5. Include practical steps, examples, limitations, and common mistakes.
6. Add an FAQ section addressing genuine user questions.
7. Identify claims that require current sources or fact-checking.
8. Suggest relevant internal-link opportunities.
9. Avoid fabricated statistics, quotes, experience, and credentials.
10. Write for readers first rather than targeting a fixed keyword density.

Before writing the complete article, return the proposed outline for review.
Final SEO Prompt Tips
For more useful AI-generated SEO content:
Define the audience and search intent.
Provide source material whenever possible.
Include your product, service, or brand context.
Specify the required output format.
Ask the AI to identify uncertain claims.
Generate and review long articles section by section.
Avoid strict keyword-density requirements.
Fact-check statistics, quotes, product details, and current policies.
Add original expertise, examples, screenshots, or test results.
Edit the final draft so it reflects a consistent human voice.
Conclusion
ChatGPT can accelerate many SEO tasks, from keyword clustering and article planning to editing, internal linking, and content refreshing. Its greatest value is not simply producing more text—it is helping marketers organize ideas, identify gaps, and improve existing workflows.
The most effective prompts clearly define the task, audience, search intent, constraints, and desired output. AI-generated recommendations should still be reviewed by a human, supported by reliable sources, and refined with genuine experience.