Unlocking the Mysteries of YOLO: Understanding Object Detection and Prediction with Python
Deep learning's algorithms can identify and locate items in still pictures or video footage, and object detection is one of its most significant components. These processes increasingly make use of deep learning capabilities, including the highly effective object detection method known as “You Only Look Once” or YOLO. In real-time systems where precision and speed are critical, YOLO excels; and it is well-known for its rapid and accurate vision identification algorithms. This post will focus on building YOLO while implementing it step by step with Python. We will also cover the technical details of the algorithm, including how it works and how it is structured.
Attention will first be shifted towards the working principles of YOLO; with an emphasis on its distinction from other techniques: the single-stage detection approach that sets it apart from R-CNN and SSD algorithms. Apart from blending categorization and location in one prediction, the other key uniqueness will be exposed in regards to how YOLO conducts image splitting and bounding box prediction. After defining the most critical features of YOLO, we will focus on practical work: installation of required packages, data cleaning and preparation, and creating a new model to allow for Python object detection using YOLO.
After completing the article, readers will have both logical understanding and practical mastery of applying YOLO enabling them to utilize this tool in various computer vision tasks. This article caters for all levels, ranging from absolute beginners to experienced developers and will aid readers in achieving and effectively employing underwater scenariors with YOLO as well.
How Does the YOLO Model Work in Object Detection?
YOLO (You Only Look Once) is an innovative algorithm for object detection that considers detection as a regression challenge: it attempts to guess bounding boxes and class probabilities in a single shot evaluation, using only one input image. In contrast to classical approaches that use region proposals and several evaluations, YOLO segments the image into an SxS grid and assigns each grid cell to complete detection functionalities. Each grid cell predicts a set number of bounding boxes along with their corresponding set confidence scores and class probabilities. Because of this architecture, YOLO is capable of real-time image processing with high spatial resolution which is crucial for its popular use in automated surveillance, driving, and robotics.
What is the YOLO Model?
The YOLO (You Only Look Once) model is the newest system on the market for object detection which does it by splitting an image into sections. These sections comprise a grid that make it possible to predict bounding boxes, class probabilities, and confidence scores all in one go using the single forward pass within the neural network. Unlike traditional techniques that require multiple passes or region proposals, YOLO logic is that detection can be performed in real time; achieving good speed as well as accuracy. These capabilities, as well as its spatial precision, make it notable for use in areas such as surveillance, self-driving cars, and robotics.
How Does YOLO Perform Real-Time Object Detection?
YOLO is designed for real-time object detection by reframing the detection problem as a regression problem. It splits the input image into an S×S grid where each cell is responsible for predicting bounding boxes and the class probability of objects within that cell. The entire image is processed, in a single forward pass through the network, which enhances the model's capacity to capture contextual information and increases the speed of processing. YOLO achieves real-time efficiency in terms of both computational speed and accuracy of the detection, making it ideal for use cases that require fast decision-making.
What are the Key Features of YOLO in Computer Vision?
YOLO, which stands for 'You Only Look Once,' is an object detection framework with an advanced set of features. First, it enables high-speed computation for real-time applications by bypassing the requirement of processing image with multiple neural networks evaluations, rather it processes it with a single evaluation. Second, YOLO predicts class object names and bounding boxes simultaneously from the image instead of using traditional methods estimation, this enables the balance between precision and efficiency. Finally, it has good generalization capability across different tasks which makes it adaptable to perform in highly diverse and challenging environments. The combination of all these features makes YOLO an outstanding tool in computer vision.
What is the Output of a YOLO Prediction?
When a YOLO prediction is made, the output consists of several bounding boxes which each have a predicted class label and confidence score. Each bounding box has specific parameters that define the position of an object in an image, for instance, center x, center y, width, and height. An object’s predicted class label describes what the object is, and the confidence score signifies the likelihood that the object in question is indeed within the pre-defined class. With this structure, YOLO is able to represent all detected objects and their features in a single run of the model.
Understanding the Bounding Box and Confidence Score
Although the explanation of your inquiries was very brief, I would like to elaborate on the topic of bounding boxes. Bounding boxes are rectangular regions that mark the position of an object in an image. They can be defined by their central point, which is represented as coordinates (x,y), and size measured in width and height. On the other hand, the confidence score provides a measurement of how probable it is that the object of interest is contained within a bounding box (detected) of the predicted class. For example if the bounding box has a confidence score of 0.85, it suggests that there is an 85% chance that the object within the bounding box is the one being predicted. This makes it possible to estimate both the position of the object and check the credibility of the prediction which is one of the foundations in object detection models like YOLO.
How Does YOLO Predict Object Classes?
An understanding on how features learned from image regions inside bounding boxes are classified is enough to understand how YOLO predicts object classes. In the training stage, a Convolutional Neural Network (CNN) is trained on the input images to establish a feature representation. Each grid cell in the image is expected to predict a fixed number of bounding boxes which have a class probability distribution for each predefined class.
The main parameters are introduced:
- Grid Size: YOLO splits the image into an S x S grid, each grid cell is responsible for detecting objects whose center lies in the cell.
- Bounding Boxes per Grid Cell: Each cell makes B bounding box predictions, with B typically equal to 2 to 5 in most implementations.
- Class Predictions: Each bounding box was predicted to have a class probability C, where C is the total number of utilized object classes.
- Confidence Score: Represents the probability of the object being there and the bounding box being around the object accurately.
With the use of these bounding box coordinates, class probabilities, and confidence scores, YOLO achieves fast and accurate object detection for a wide variety of use cases.
How to Visualize the Results of a YOLO Prediction?
In order to visualize the results yielded by a YOLO prediction, I make use of the YOLO model by first running the target image or video through it. Its output comprises the bounding box coordinates alongside a class probability and a confidence score. To visualize the predicted bounding boxes, I use image processing software like OpenCV to draw them on the original frame with the corresponding class name and confidence if applicable. In addition, to increase understanding and ensure clarity, I assign different colors to differnt classes, resulting in visually appealing predictions that reinforce the object detection results.
How to Train the YOLO Model for Specific Object Detection?

To train the YOLO model for specific object detection, follow these steps:
- Dataset Preparation: Collect and annotate a dataset tailored to the objects you want to detect. Use labeling tools like LabelImg or Roboflow to generate bounding box annotations in the required format (e.g., YOLO format).
- Model Configuration: Modify the YOLO model's configuration file to match the number of object classes in your dataset. Adjust parameters such as the number of filters in the final convolutional layer and update the
anchorsif needed. - Environment Setup: Install required dependencies, such as PyTorch or TensorFlow, and ensure you have a compatible GPU for efficient training.
- Transfer Learning: Leverage pre-trained YOLO weights to fine-tune the model on your dataset. This accelerates training and enhances performance, especially for smaller datasets.
- Training: Use a YOLO training framework (e.g., Darknet or PyTorch implementations) to train the model. Specify hyperparameters like learning rate, batch size, and number of epochs based on the dataset size and complexity.
- Model Evaluation: After training, validate the model on a separate validation set to assess its performance. Evaluate metrics such as mAP (mean Average Precision) and precision-recall curves.
- Fine-Tuning: If performance is suboptimal, adjust hyperparameters, refine annotations, or augment the dataset to improve robustness.
These steps will optimize YOLO for detecting the specific objects in your dataset effectively.
What are the Steps to Train a Model from Scratch?
Training a model from scratch involves several systematic steps, each requiring careful execution to ensure optimal performance. Below is a concise outline of the process:
- Define the Problem
Identify the specific task the model will address (e.g., object detection, classification) and determine its scope.
- Prepare the Dataset
- Collect and curate a large, diverse dataset relevant to the task.
- Split the dataset into training, validation, and test sets, typically at a ratio of 70-15-15 or 80-10-10.
- Label data appropriately, ensuring consistency and accuracy in annotations.
- Select a Model Architecture
Choose a model architecture suited to your problem. For example:
- YOLO for real-time object detection.
- ResNet for image classification.
- RNNs/LSTMs for sequential data.
- Initialize the Model
Start with random weights or shallow model initialization methods. Ensure an appropriate input size matching the data format.
- Set Hyperparameters
Configure essential training parameters:
- Learning rate (e.g., 0.001 for most optimizers; adjust as needed).
- Batch size (e.g., 16, 32, or 64 based on system memory).
- Number of epochs (10–100 depending on dataset size and convergence behavior).
- Optimizer (e.g., Adam, SGD with momentum).
- Loss function (depends on task, e.g., cross-entropy for classification, MSE for regression).
- Model Training
Use a deep learning framework (e.g., TensorFlow, PyTorch) to train the model. Monitor metrics during training, such as accuracy or loss, and implement callbacks like early stopping to prevent overfitting.
- Model Validation
Evaluate the trained model on the validation set:
- Measure metrics (e.g., accuracy, mAP, F1 score).
- Plot precision-recall curves for tasks like object detection.
- Model Testing
Finalize assessment on the test set, ensuring it represents unseen data to validate real-world performance.
- Optimization and Fine-Tuning
Adjust hyperparameters, retrain with augmented data, or modify the model architecture to address underperformance or overfitting.
- Model Deployment
Convert the model to a format suitable for deployment (e.g., ONNX, TensorRT for optimized inference) and integrate it into the target application.
These steps cover the technical parameters and systematic approach required for training a model from scratch efficiently and effectively.
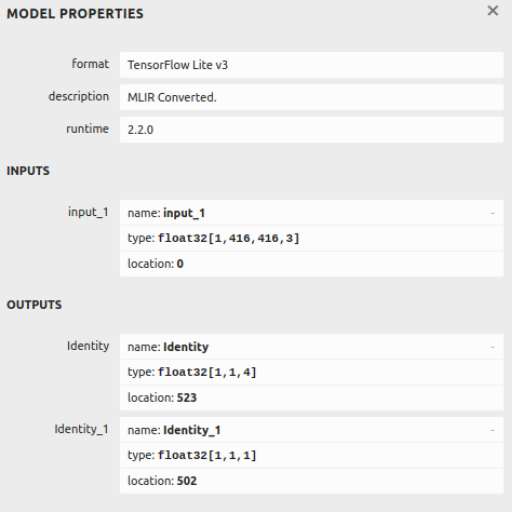
How do you use a dataset to Train YOLO?
To train YOLO on a given dataset, I first prepare the labeled dataset in the required YOLO format with annotation files for bounding box coordinates and class labels per object. After this, I preprocess the data by scaling the images to the dimensions that YOLO expects (in this case, 416x416). Afterward, I set up the YOLO model by outlining the network, inputting the number of classes and adjusting the anchor boxes as necessary. Additionally, I update the training configuration file with the dataset paths, set the batch size, learning rate, and other parameters. When everything is set, I train the model with a suitable framework (Darknet, Pytorch, or Tensorflow) while tracking the loss function for convergence. Then, I test the accuracy of the model using a separate validation set and evaluate the model in practical situations.
What are the Best Practices for Training the Model from Scratch?
I implement certain best practices so that the training of my YOLO model is both efficient and effective. While creating the model, I have a starting approach in mind. First, I put all my emphasis on using a clean diverse dataset. This ensures that the target application domain is well captured, has high-value class distribution which is balanced, as well as precise and quality annotations. I also focus on normalization, such as rescaling, and implement flipping, rotation, and scaling, as they can be useful for augmenting generalization.
In terms of hyperparameters, learning rate (starting with 0.001 and gradually decaying it), batch size (either 16 or 64, depending on memory limits), and momentum (currently set to 0.9) so far, has been a positive addition towards update stabilization. I integrate methods such as warm restarts and a cosine learning rate, as they allow me fine control during training. Appropriate optimizers such as SGD with weight decay (0.0005) have also helped a great deal in increasing convergence while limiting overfitting. A practice that I find particularly aids tracking progress is evaluating my model on a validation set frequently. That way, I can observe mAP (mean Average Precision) and loss which is helpful for a setting early stop.
Lastly, where applicable I use mixed precision training for its speed and efficient use of hardware resources. Regularly saving checkpoints protects progress and enables rolling back to the best performing model based on validation metrics. These principles ensure a training pipeline that is accurate and easily deployable in practical scenarios.
How to Optimize YOLO for Real-Time Object Detection?
Maximizing efficiency and effectiveness in the detection task using YOLO can be obtained by careful consideration of the architecture and performance of the underlying hardware. First, for lighter estimations, switch to smaller variants of YOLO, and here YOLOv4-tiny and YOLOv8-nano would do the job with no significant accuracy incurred on the loss. Reduce the number of parameters with pruning and model quantization to make the model compatible with edge hardware to lower the computational overhead. Employ dedicated hardware to speed up GPU inference like TensorRT or Coral Edge TPU. Other simplifications include using batch normalization, fewer anchor boxes, adjusting input image size for trade off between speed and detection accuracy, and, prefetching and loading data asynchronously. YOLO can be made to perform in real-time even under restrictive environments by using these methods in unison.
What are the Techniques for Enhancing YOLO's Real-Time Object Detection Capabilities?
I target three primary areas in order to improve YOLO's object detection speed. First, I try to reduce the size of the network and the time needed for inference by applying model compression methods like pruning and quantization, even if it may slightly affect accuracy. Second, I make sure to leverage GPUs, TensorRT, or edge devices like Coral TPU to ensure that I utilize the hardware efficiently for acceleration. Finally, I adjusted the input pipeline by resizing images, applying batch normalization, and reducing the number of anchor boxes, which optimizes performance while minimizing computing resources. All of these approaches make the object detection faster and more efficient.
How do you adjust YOLO's image size and width and height parameters?
To change YOLO's image scale and its width and height measurements, I change the input_size or image_size parameter in the model configuration file or script for a particular version of YOLO. More specifically, I make certain that the width (img_width) and height (img_height) are set to a value that is a multiple of 32, because YOLO’s architecture works on an image block processing system, which means it works best when images are divided into blocks of 32. For instance, a common size configuration is 416x416 or 640x640, which offers a good tradeoff between speed and accuracy. Furthermore, I set these values using --img-size in the appropriate command line interface wherever it is offered during training or inference at times when I want to set image size in pixels. With these changes, the model should be able to work well with the available hardware limits and task requirements.
What is the Role of Ultralytics YOLO in Improving Real-Time Processing?
Ultralytics YOLO is one of the main contributors to optimizing processing time by providing real-time object detection at an incredible speed and efficiency. Its sophisticated deep learning algorithms make it possible to identify and categorize objects on a system within a few milliseconds, signifying effective resource use. This feature is essential in autonomous vehicles, surveillance, and robotics where quick and accurate decisions are needed. Ultralytics YOLO is a major contributor for accomplishing real-time solutions because it simplifies the deployment of the models while ensuring good performance across different devices.
References
- Object Detection with YOLO and OpenCV - GeeksforGeeks
- Object Detection with YOLO: Hands-on Tutorial - Neptune.ai
- Python - Ultralytics YOLO Documentation
Frequently Asked Questions (FAQ)
Q: What is YOLO and how does it relate to object detection using machine learning?
A: YOLO, which stands for "You Only Look Once," is an advanced object detection technique that uses a single neural network to predict multiple bounding boxes and class probabilities for detected objects in an image using machine learning. This approach provides real-time object detection capabilities.
Q: How can I implement object detection using YOLO11 with Python?
A: To implement object detection using YOLO11 with Python, you need to import YOLO, load a pre-trained model, and use the model to detect objects in images or videos. The Ultralytics YOLO docs provide a comprehensive step-by-step guide to help you through the process.
Q: What are the key differences between YOLO11 and other versions like YOLOv8?
A: YOLO11 is an earlier version of the YOLO family, which focuses on object detection using a single neural network pass. YOLOv8, developed by Ultralytics, comes with improved accuracy, speed, and features like segmentation and optimized inference time.
Q: How do I load a pre-trained model in YOLO11?
A: You can load a pre-trained model in YOLO11 by using the `import yolo` command, which allows you to leverage pre-trained model weights for object detection tasks. This step is crucial to ensure the model is trained for specific objects you want to detect.
Q: Can YOLO11 be used for live streams and how?
A: Yes, YOLO11 can be used for live streams. You can set up a streaming source to feed live video data into the YOLO network. By adjusting the inference time and batch size, you can achieve real-time object detection using live streams.
Q: What is the role of Tauseef Ahmad in the development or dissemination of YOLO11?
A: Tauseef Ahmad is known for sharing a step-by-step methodology and contributing insights into the application of YOLO11. His work often involves detailed guides and tutorials that help users understand how to utilize YOLO11 effectively for object detection.
Q: How do you ensure accurate classification and prediction using YOLO11?
A: Accurate classification and prediction using YOLO11 involve using a well-trained model with appropriate pre-trained weights. Additionally, ensuring the input image is of good quality and the model is optimized for the specific objects you want to identify will improve accuracy.
Q: Where can I find resources or code snippets to build a simple object detector with YOLO11?
A: You can find resources, code snippets, and a step-by-step guide to building a simple object detector with YOLO11 on platforms like GitHub, where developers share their projects and tutorials. The Ultralytics YOLO docs and various articles recommended from Medium are also valuable sources.
Q: How do you handle different input image formats in YOLO11?
A: YOLO11 can handle various input image formats by converting them into a suitable format like a numpy array. This conversion ensures that the images are compatible with the YOLO network for processing and object detection tasks.